
As a WordPress developer and SEO specialist at Jackober, I’ve implemented numerous email marketing integrations for clients across various industries. One of the most powerful combinations I’ve worked with is the Constant Contact API integration with WordPress websites.
Email marketing remains one of the most effective digital marketing channels, with an average ROI of $36 for every $1 spent. For WordPress site owners, leveraging Constant Contact’s robust email marketing platform through API integration can significantly enhance lead generation, customer engagement, and conversion rates.
In this experts guide, I’ll walk you through everything you need to know about integrating the Constant Contact API with WordPress – from basic implementation to advanced customization techniques. Whether you’re a developer looking to create custom integrations or a site owner seeking to understand the possibilities, this guide will provide valuable insights based on real-world implementation experience.
Understanding the Constant Contact API
Before diving into WordPress integration specifics, let’s establish a clear understanding of what the Constant Contact API offers and how it works.
What is the Constant Contact API?
The Constant Contact API (Application Programming Interface) is a set of protocols and tools that allows developers to interact with Constant Contact’s email marketing platform programmatically. It enables you to:
- Access and manage contact lists
- Create and send email campaigns
- Track campaign performance
- Manage sign-up forms
- Handle event registrations
- Process e-commerce data
- Automate marketing workflows
The API essentially serves as a bridge between your WordPress website and your Constant Contact account, allowing data to flow seamlessly between the two platforms.
Constant Contact API Versions
Constant Contact currently offers two main API versions:
V3 API (Current)
- REST-based architecture
- JSON data format
- OAuth 2.0 authentication
- More comprehensive feature set
- Improved performance and reliability
V2 API (Legacy)
- REST-based architecture
- XML and JSON support
- OAuth 1.0a authentication
- Being phased out gradually
For new integrations, you should always use the V3 API, as V2 will eventually be deprecated. All examples in this guide will focus on the V3 API.
API Authentication Methods
The Constant Contact V3 API uses OAuth 2.0 for authentication, which provides secure access to user accounts. There are two primary authentication flows:
Server-to-Server OAuth Flow
- Used for applications that need to access Constant Contact without user interaction
- Requires API key and secret
- Generates access tokens with longer expiration periods
- Ideal for background processes and automation
User Authorization OAuth Flow
- Used when acting on behalf of a specific Constant Contact user
- Requires user to grant permission
- Redirects through Constant Contact’s authorization screens
- Ideal for integrations where users connect their own Constant Contact accounts
For most WordPress integrations, the server-to-server flow is more appropriate, especially for sites managed by a single organization.
Setting Up Constant Contact Developer Account
Before you can integrate with WordPress, you need to set up a Constant Contact developer account and create an API application.
Step 1: Sign Up for a Developer Account
- Visit the Constant Contact Developer Portal
- Click “Sign Up” and create an account (or sign in if you already have one)
- Complete the registration process
Step 2: Create a New API Application
- Navigate to the “My Applications” section
- Click “Create New Application”
- Fill in the required information:
- Application Name: Choose a descriptive name for your integration
- Application Description: Briefly describe what your integration will do
- Organization Website: Enter your website URL
- Redirect URI: For WordPress integrations, typically your admin URL (e.g., https://yourdomain.com/wp-admin/admin.php?page=constant-contact-callback)
Step 3: Get Your API Credentials
Once your application is created, you’ll receive:
- API Key
- App Secret
- API Endpoint URLs
These credentials are essential for authenticating your WordPress site with the Constant Contact API. Store them securely, as they provide access to your Constant Contact account.
WordPress Integration Methods
There are several ways to integrate Constant Contact with WordPress, ranging from simple plugin solutions to custom API implementations.
Method 1: Official Constant Contact Plugin
The simplest integration method is using the official Constant Contact plugin for WordPress.
Pros:
- Easy setup with no coding required
- Basic form creation and management
- List synchronization
- Automatic updates and support
Cons:
- Limited customization options
- Basic functionality only
- Not ideal for complex integrations
- Less control over user experience
Installation and Setup:
- Go to Plugins → Add New in your WordPress dashboard
- Search for “Constant Contact”
- Install and activate the official plugin
- Connect your Constant Contact account
- Configure basic settings and create forms
This method works well for simple websites that need basic email list sign-up functionality without advanced customization.
Method 2: Third-Party Integration Plugins
Several third-party plugins offer more advanced Constant Contact integration features.
Popular options include:
- WPForms (with Constant Contact addon)
- Gravity Forms (with Constant Contact addon)
- Formidable Forms (with Constant Contact integration)
- OptinMonster (with Constant Contact support)
Pros:
- More features than the official plugin
- Better form building capabilities
- Additional marketing tools
- Integration with other plugins
Cons:
- Often requires premium versions
- Still limited to the features the plugin developer provides
- Potential compatibility issues with theme or other plugins
These solutions work well for businesses that need more robust form functionality but don’t require completely custom integrations.
Method 3: Custom API Integration
For maximum flexibility and control, a custom Constant Contact API integration is the best approach. This involves writing custom code to interact directly with the API.
Pros:
- Complete control over functionality
- Customized user experience
- Integration with any aspect of your WordPress site
- Advanced automation possibilities
- Better performance optimization
Cons:
- Requires development expertise
- More time-intensive to implement
- Ongoing maintenance responsibility
This approach is ideal for businesses with specific requirements, complex workflows, or unique integration needs that off-the-shelf plugins can’t fulfill. As a WordPress Expert for Hire, I typically recommend this approach for clients who need precise control over their email marketing integrations.
Implementing Custom Constant Contact API Integration
Let’s explore how to implement a custom Constant Contact API integration with WordPress, focusing on the most common use cases.
Setting Up the Integration Foundation
First, we need to create a foundation for our API integration:
Step 1: Create a Custom Plugin
Rather than modifying your theme or using functions.php, create a dedicated plugin for your Constant Contact integration:
<?php
/**
* Plugin Name: Custom Constant Contact Integration
* Description: Integrates WordPress with Constant Contact API
* Version: 1.0
* Author: Your Name
*/
// Prevent direct access
if (!defined('ABSPATH')) {
exit;
}
// Plugin class
class Custom_Constant_Contact {
// API credentials
private $api_key = 'YOUR_API_KEY';
private $app_secret = 'YOUR_APP_SECRET';
private $access_token = null;
private $token_expiry = null;
// Base API URL
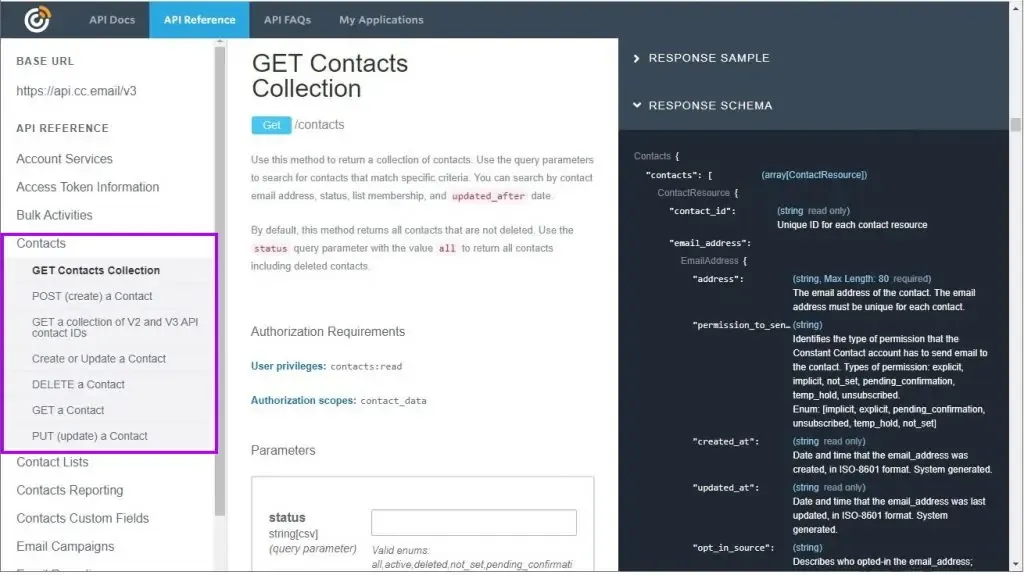
private $api_base_url = 'https://api.cc.email/v3';
// Constructor
public function __construct() {
// Initialize hooks
add_action('init', array($this, 'init'));
// Load access token if available
$this->access_token = get_option('cc_access_token');
$this->token_expiry = get_option('cc_token_expiry');
}
// Initialize plugin
public function init() {
// Check if token needs refresh
if ($this->token_expired()) {
$this->refresh_access_token();
}
}
// Check if token is expired
private function token_expired() {
if (!$this->token_expiry) {
return true;
}
return time() > $this->token_expiry;
}
// Get fresh access token
private function refresh_access_token() {
// Implementation will go here
}
}
// Initialize the plugin
$custom_constant_contact = new Custom_Constant_Contact();
Step 2: Implement OAuth Authentication
Next, implement the OAuth authentication to get an access token:
// Add to your plugin class
private function refresh_access_token() {
    $url = 'https://authz.constantcontact.com/oauth2/default/v1/token';

    $args = array(
        'method' => 'POST',
        'headers' => array(
            'Content-Type' => 'application/x-www-form-urlencoded',
            'Authorization' => 'Basic ' . base64_encode($this->api_key . ':' . $this->app_secret)
        ),
        'body' => array(
            'grant_type' => 'client_credentials',
            'scope' => 'contact_data campaign_data offline_access'
        )
    );

    $response = wp_remote_post($url, $args);

    if (is_wp_error($response)) {
        error_log('Constant Contact API Error: ' . $response->get_error_message());
        return false;
    }

    $body = json_decode(wp_remote_retrieve_body($response), true);

    if (isset($body['access_token'])) {
        $this->access_token = $body['access_token'];
        $this->token_expiry = time() + $body['expires_in'];

        update_option('cc_access_token', $this->access_token);
        update_option('cc_token_expiry', $this->token_expiry);

        return true;
    }

    return false;
}
Step 3: Create Helper Functions for API Requests
Add helper functions to make API requests:
// Add to your plugin class
private function api_request($endpoint, $method = 'GET', $data = null) {
    $url = $this->api_base_url . $endpoint;

    $args = array(
        'method' => $method,
        'headers' => array(
            'Authorization' => 'Bearer ' . $this->access_token,
            'Content-Type' => 'application/json'
        )
    );

    if ($data && ($method === 'POST' || $method === 'PUT')) {
        $args['body'] = json_encode($data);
    }

    $response = wp_remote_request($url, $args);

    if (is_wp_error($response)) {
        error_log('Constant Contact API Error: ' . $response->get_error_message());
        return false;
    }

    $body = json_decode(wp_remote_retrieve_body($response), true);
    $code = wp_remote_retrieve_response_code($response);

    if ($code >= 200 && $code < 300) {
        return $body;
    } else {
        error_log('Constant Contact API Error: ' . json_encode($body));
        return false;
    }
}
Implementing Common Constant Contact Features
Now that we have our foundation, let’s implement the most commonly needed features.
Feature 1: Get Contact Lists
// Add to your plugin class
public function get_contact_lists() {
    return $this->api_request('/contact_lists');
}
Feature 2: Add Contact to List
// Add to your plugin class
public function add_contact($email, $first_name = '', $last_name = '', $list_ids = array()) {
    $contact_data = array(
        'email_address' => array(
            'address' => $email,
            'permission_to_send' => 'implicit'
        ),
        'first_name' => $first_name,
        'last_name' => $last_name,
        'list_memberships' => $list_ids
    );

    return $this->api_request('/contacts', 'POST', $contact_data);
}
Feature 3: Create a Sign-Up Form Shortcode
// Add to your plugin class constructor
public function __construct() {
    // Existing code...

    // Register shortcode
    add_shortcode('constant_contact_form', array($this, 'form_shortcode'));
}

// Add shortcode handler
public function form_shortcode($atts) {
    // Parse attributes
    $atts = shortcode_atts(array(
        'list_id' => '',
        'success_message' => 'Thank you for subscribing!',
        'button_text' => 'Subscribe',
        'show_name' => 'yes'
    ), $atts);

    // Generate unique form ID
    $form_id = 'cc_form_' . uniqid();

    // Handle form submission
    if (isset($_POST[$form_id]) && wp_verify_nonce($_POST['cc_nonce'], 'cc_form_nonce')) {
        $email = sanitize_email($_POST['cc_email']);
        $first_name = sanitize_text_field($_POST['cc_first_name'] ?? '');
        $last_name = sanitize_text_field($_POST['cc_last_name'] ?? '');

        if (is_email($email)) {
            $result = $this->add_contact($email, $first_name, $last_name, array($atts['list_id']));

            if ($result) {
                return '<div class="cc-success">' . esc_html($atts['success_message']) . '</div>';
            } else {
                return '<div class="cc-error">There was an error. Please try again.</div>';
            }
        }
    }

    // Form HTML
    $html = '<form method="post" id="' . esc_attr($form_id) . '" class="cc-signup-form">';

    if ($atts['show_name'] === 'yes') {
        $html .= '<div class="cc-form-row">';
        $html .= '<label for="cc_first_name">First Name</label>';
        $html .= '<input type="text" name="cc_first_name" id="cc_first_name">';
        $html .= '</div>';

        $html .= '<div class="cc-form-row">';
        $html .= '<label for="cc_last_name">Last Name</label>';
        $html .= '<input type="text" name="cc_last_name" id="cc_last_name">';
        $html .= '</div>';
    }

    $html .= '<div class="cc-form-row">';
    $html .= '<label for="cc_email">Email Address (required)</label>';
    $html .= '<input type="email" name="cc_email" id="cc_email" required>';
    $html .= '</div>';

    $html .= wp_nonce_field('cc_form_nonce', 'cc_nonce', true, false);
    $html .= '<input type="hidden" name="' . esc_attr($form_id) . '" value="1">';
    $html .= '<button type="submit">' . esc_html($atts['button_text']) . '</button>';
    $html .= '</form>';

    return $html;
}
Feature 4: WooCommerce Integration for E-commerce Sites
For E-commerce WordPress sites using WooCommerce, you can add customers to your email list after purchase:
// Add to your plugin class constructor
public function __construct() {
    // Existing code...

    // Add WooCommerce integration if active
    if (class_exists('WooCommerce')) {
        add_action('woocommerce_checkout_order_processed', array($this, 'add_customer_after_purchase'), 10, 3);
    }
}

// Add customer to list after purchase
public function add_customer_after_purchase($order_id, $posted_data, $order) {
    // Get customer details
    $email = $order->get_billing_email();
    $first_name = $order->get_billing_first_name();
    $last_name = $order->get_billing_last_name();

    // Add customer to a specific list (e.g., "Customers")
    $customers_list_id = 'YOUR_CUSTOMERS_LIST_ID';

    // Add to Constant Contact
    $this->add_contact($email, $first_name, $last_name, array($customers_list_id));

    // Optionally, track purchase data for better segmentation
    // This would require additional custom code to use Constant Contact's custom fields
}
Advanced Integration Techniques
For more sophisticated integrations, consider these advanced techniques:
Implementing Webhook Support
Webhooks allow Constant Contact to send data back to your WordPress site when certain events occur:
// Add to your plugin class
public function register_webhooks() {
    // Register REST API endpoint for webhook
    add_action('rest_api_init', function() {
        register_rest_route('constant-contact/v1', '/webhook', array(
            'methods' => 'POST',
            'callback' => array($this, 'process_webhook'),
            'permission_callback' => '__return_true' // You should implement proper validation
        ));
    });
}

public function process_webhook($request) {
    $payload = $request->get_json_params();

    // Validate webhook (implement proper validation in production)

    // Process different event types
    if (isset($payload['event_type'])) {
        switch ($payload['event_type']) {
            case 'email_open':
                // Handle email open event
                break;
            case 'email_click':
                // Handle email click event
                break;
            case 'contact_unsubscribe':
                // Handle unsubscribe
                break;
        }
    }

    return new WP_REST_Response(array('status' => 'success'), 200);
}
Syncing WordPress Users
For membership sites or sites with user registration, you can automatically sync WordPress users with Constant Contact:
// Add to your plugin class constructor
public function __construct() {
    // Existing code...

    // Sync new user registrations
    add_action('user_register', array($this, 'sync_new_user'));

    // Sync user profile updates
    add_action('profile_update', array($this, 'sync_user_update'));
}

// Sync new WordPress user to Constant Contact
public function sync_new_user($user_id) {
    $user = get_userdata($user_id);

    if ($user) {
        $email = $user->user_email;
        $first_name = $user->first_name;
        $last_name = $user->last_name;

        // Default list for all users
        $default_list_id = 'YOUR_DEFAULT_LIST_ID';

        // Add to Constant Contact
        $this->add_contact($email, $first_name, $last_name, array($default_list_id));
    }
}

// Update user in Constant Contact when profile is updated
public function sync_user_update($user_id) {
    // Similar to sync_new_user but would use update_contact method
    // You would need to implement the update_contact method
}
Campaign Performance Tracking
Track email campaign performance within your WordPress dashboard:
// Add to your plugin class
public function get_campaign_stats($campaign_id) {
    return $this->api_request('/emails/' . $campaign_id . '/statistics');
}

// Add admin page to display stats
public function add_admin_page() {
    add_menu_page(
        'Email Analytics',
        'Email Analytics',
        'manage_options',
        'constant-contact-analytics',
        array($this, 'render_analytics_page'),
        'dashicons-chart-line',
        100
    );
}

public function render_analytics_page() {
    // Get recent campaigns
    $campaigns = $this->api_request('/emails');

    // Render analytics dashboard
    echo '<div class="wrap">';
    echo '<h1>Constant Contact Analytics</h1>';

    if ($campaigns && !empty($campaigns['results'])) {
        foreach ($campaigns['results'] as $campaign) {
            $stats = $this->get_campaign_stats($campaign['campaign_id']);

            // Display campaign stats
            echo '<div class="campaign-stats">';
            echo '<h2>' . esc_html($campaign['name']) . '</h2>';
            echo '<p>Sent: ' . esc_html($campaign['sent_date']) . '</p>';

            if ($stats) {
                echo '<ul>';
                echo '<li>Opens: ' . esc_html($stats['opens']['count']) . ' (' . esc_html($stats['opens']['rate']) . '%)</li>';
                echo '<li>Clicks: ' . esc_html($stats['clicks']['count']) . ' (' . esc_html($stats['clicks']['rate']) . '%)</li>';
                echo '<li>Bounces: ' . esc_html($stats['bounces']['count']) . ' (' . esc_html($stats['bounces']['rate']) . '%)</li>';
                echo '<li>Unsubscribes: ' . esc_html($stats['unsubscribes']['count']) . '</li>';
                echo '</ul>';
            }

            echo '</div>';
        }
    } else {
        echo '<p>No campaigns found.</p>';
    }

    echo '</div>';
}
Integration with WordPress Page Builders
For users of Best WordPress Page Builders, you can create custom elements for Constant Contact forms:
Example: Elementor Widget Integration
// First, ensure Elementor is active
if (did_action('elementor/loaded')) {
    // Register Elementor widget
    add_action('elementor/widgets/widgets_registered', function() {
        // Include widget file
        require_once plugin_dir_path(__FILE__) . 'widgets/elementor-constant-contact-widget.php';

        // Register widget
        \Elementor\Plugin::instance()->widgets_manager->register_widget_type(new \Elementor_Constant_Contact_Widget());
    });
}
Then create the widget class in the specified file:
// In widgets/elementor-constant-contact-widget.php
class Elementor_Constant_Contact_Widget extends \Elementor\Widget_Base {
    public function get_name() {
        return 'constant_contact_form';
    }

    public function get_title() {
        return 'Constant Contact Form';
    }

    public function get_icon() {
        return 'eicon-form-horizontal';
    }

    public function get_categories() {
        return ['general'];
    }

    protected function _register_controls() {
        // Add controls for list selection, form fields, etc.
        $this->start_controls_section(
            'content_section',
            [
                'label' => 'Form Settings',
                'tab' => \Elementor\Controls_Manager::TAB_CONTENT,
            ]
        );

        // Get available lists
        $constant_contact = new Custom_Constant_Contact();
        $lists = $constant_contact->get_contact_lists();

        $list_options = [];
        if ($lists && isset($lists['results'])) {
            foreach ($lists['results'] as $list) {
                $list_options[$list['list_id']] = $list['name'];
            }
        }

        $this->add_control(
            'list_id',
            [
                'label' => 'Select List',
                'type' => \Elementor\Controls_Manager::SELECT,
                'options' => $list_options,
                'default' => array_key_first($list_options),
            ]
        );

        // Add more controls...

        $this->end_controls_section();
    }

    protected function render() {
        $settings = $this->get_settings_for_display();

        // Generate shortcode based on settings
        $shortcode = '[constant_contact_form list_id="' . esc_attr($settings['list_id']) . '"';

        // Add other attributes based on settings

        $shortcode .= ']';

        // Output shortcode
        echo do_shortcode($shortcode);
    }
}
Performance Optimization for API Integration
When integrating with external APIs like Constant Contact, performance considerations are crucial. Here are some best practices:
1. Implement Caching
Cache API responses to reduce API calls:
// Add to your plugin class
private function get_cached_api_request($endpoint, $method = 'GET', $data = null) {
    // Generate cache key
    $cache_key = 'cc_api_' . md5($endpoint . $method . json_encode($data));

    // Check cache
    $cached_response = get_transient($cache_key);
    if ($cached_response !== false) {
        return $cached_response;
    }

    // Make actual API request
    $response = $this->api_request($endpoint, $method, $data);

    // Cache response for 1 hour (3600 seconds)
    if ($response && $method === 'GET') {
        set_transient($cache_key, $response, 3600);
    }

    return $response;
}
2. Use Asynchronous Processing for Bulk Operations
For operations like bulk imports, use WordPress background processing:
// Implement a background process class (requires WP_Background_Process)
class CC_Background_Process extends WP_Background_Process {
    protected $action = 'cc_background_process';

    protected function task($item) {
        // Process single item (e.g., add contact)
        $constant_contact = new Custom_Constant_Contact();
        $constant_contact->add_contact($item['email'], $item['first_name'], $item['last_name'], $item['list_ids']);

        return false; // Return false to remove item from queue
    }

    protected function complete() {
        parent::complete();

        // Optional: Trigger action when all items are processed
        do_action('cc_import_complete');
    }
}

// Usage example for bulk import
$processor = new CC_Background_Process();

foreach ($contacts as $contact) {
    $processor->push_to_queue($contact);
}

$processor->save()->dispatch();
3. Optimize WordPress Database Interactions
Minimize database queries when working with API data:
// Add to your plugin class
public function get_all_contact_lists() {
    // Check if we have this in options first
    $lists = get_option('cc_contact_lists');
    $last_updated = get_option('cc_lists_last_updated');

    // If data is less than 1 hour old, use cached version
    if ($lists && $last_updated && (time() - $last_updated < 3600)) {
        return $lists;
    }

    // Otherwise, fetch fresh data
    $response = $this->api_request('/contact_lists');

    if ($response && isset($response['results'])) {
        update_option('cc_contact_lists', $response);
        update_option('cc_lists_last_updated', time());
    }

    return $response;
}
Security Best Practices
Security is paramount when working with email marketing data. Implement these security measures:
1. Secure API Credentials
Never hardcode API credentials in your plugin:
// Instead of hardcoding, use WordPress options
private function get_api_credentials() {
    $this->api_key = get_option('cc_api_key');
    $this->app_secret = get_option('cc_app_secret');

    // Check if credentials are set
    if (!$this->api_key || !$this->app_secret) {
        // Log error or notify admin
        error_log('Constant Contact API credentials not set');
        return false;
    }

    return true;
}
2. Validate and Sanitize All Data
Always validate and sanitize user input:
// Example of form data handling with validation
public function process_form_submission() {
    // Verify nonce
    if (!isset($_POST['cc_nonce']) || !wp_verify_nonce($_POST['cc_nonce'], 'cc_form_nonce')) {
        wp_die('Security check failed');
    }

    // Validate and sanitize email
    $email = isset($_POST['cc_email']) ? sanitize_email($_POST['cc_email']) : '';
    if (!is_email($email)) {
        return array('error' => 'Invalid email address');
    }

    // Sanitize other fields
    $first_name = isset($_POST['cc_first_name']) ? sanitize_text_field($_POST['cc_first_name']) : '';
    $last_name = isset($_POST['cc_last_name']) ? sanitize_text_field($_POST['cc_last_name']) : '';

    // Process valid data
    // ...
}
3. Implement Rate Limiting
Prevent abuse by implementing rate limiting:
// Add to your plugin class
private function check_rate_limit($key = 'default') {
    $rate_limits = get_option('cc_rate_limits', array());
    $current_time = time();

    // Initialize or clean up old entries
    if (!isset($rate_limits[$key]) || $rate_limits[$key]['reset'] < $current_time) {
        $rate_limits[$key] = array(
            'count' => 0,
            'reset' => $current_time + 3600 // 1 hour window
        );
    }

    // Check if limit reached (e.g., 100 requests per hour)
    if ($rate_limits[$key]['count'] >= 100) {
        return false;
    }

    // Increment counter
    $rate_limits[$key]['count']++;
    update_option('cc_rate_limits', $rate_limits);

    return true;
}
4. Use SSL for All Communications
Ensure your WordPress site has proper SSL implementation. Our guide on How to add SSL to WordPress provides detailed instructions.
Troubleshooting Common Integration Issues
Even with careful implementation, issues can arise. Here are solutions to common problems:
1. Authentication Failures
If you’re experiencing authentication issues:
- Verify API credentials are correct
- Check if access token is expired
- Ensure proper OAuth flow implementation
- Verify API permissions and scopes
// Add debugging for authentication issues
private function debug_auth_issue() {
    $url = 'https://authz.constantcontact.com/oauth2/default/v1/token';

    $args = array(
        'method' => 'POST',
        'headers' => array(
            'Content-Type' => 'application/x-www-form-urlencoded',
            'Authorization' => 'Basic ' . base64_encode($this->api_key . ':' . $this->app_secret)
        ),
        'body' => array(
            'grant_type' => 'client_credentials',
            'scope' => 'contact_data campaign_data offline_access'
        )
    );

    $response = wp_remote_post($url, $args);

    // Log the full response for debugging
    error_log('Auth Response: ' . print_r($response, true));

    return $response;
}
2. Rate Limiting Issues
If you hit API rate limits:
- Implement exponential backoff for retries
- Improve caching to reduce API calls
- Batch operations when possible
// Add to your plugin class
private function api_request_with_retry($endpoint, $method = 'GET', $data = null, $retries = 3) {
    $attempt = 0;

    while ($attempt < $retries) {
        $response = $this->api_request($endpoint, $method, $data);

        // If successful or not a rate limit error, return immediately
        if ($response !== false || !isset($response['error_key']) || $response['error_key'] !== 'rate_limit_exceeded') {
            return $response;
        }

        // Rate limit hit, calculate backoff time (exponential backoff)
        $wait_time = pow(2, $attempt);

        // Log the rate limit issue
        error_log("Constant Contact rate limit hit. Retrying in {$wait_time} seconds. Attempt " . ($attempt + 1) . " of {$retries}");

        // Wait before retry
        sleep($wait_time);

        $attempt++;
    }

    // All retries failed
    error_log("Constant Contact API request failed after {$retries} retries");
    return false;
}
3. Data Synchronization Issues
If contacts aren’t properly syncing:
- Verify email format and validation
- Check for duplicate contacts
- Ensure list IDs are correct
- Look for API error responses
// Add to your plugin class
public function debug_contact_sync($email) {
    // First check if contact exists
    $encoded_email = urlencode($email);
    $existing = $this->api_request("/contacts?email={$encoded_email}");

    error_log('Contact lookup result: ' . print_r($existing, true));

    // Try to add/update the contact with detailed error logging
    $contact_data = array(
        'email_address' => array(
            'address' => $email,
            'permission_to_send' => 'implicit'
        ),
        'first_name' => 'Test',
        'last_name' => 'User',
        'list_memberships' => array('YOUR_LIST_ID')
    );

    $result = $this->api_request('/contacts', 'POST', $contact_data);
    error_log('Contact creation result: ' . print_r($result, true));

    return array(
        'lookup' => $existing,
        'create_attempt' => $result
    );
}
4. Form Submission Failures
For form submission issues:
- Check browser console for JavaScript errors
- Verify nonce validation
- Ensure form fields match expected format
- Test API connection independently
// Add to your shortcode handler
public function form_shortcode($atts) {
    // Existing code...

    // Add debug mode parameter
    $atts = shortcode_atts(array(
        'list_id' => '',
        'success_message' => 'Thank you for subscribing!',
        'button_text' => 'Subscribe',
        'show_name' => 'yes',
        'debug' => 'no'
    ), $atts);

    // Debug mode output
    $debug_output = '';
    if ($atts['debug'] === 'yes' && current_user_can('manage_options')) {
        $debug_output .= '<div class="cc-debug" style="background: #f1f1f1; padding: 15px; border: 1px solid #ddd; margin: 20px 0;">';
        $debug_output .= '<h3>Debug Information</h3>';
        $debug_output .= '<p>List ID: ' . esc_html($atts['list_id']) . '</p>';

        // Test API connection
        $lists = $this->get_contact_lists();
        $debug_output .= '<p>API Connection: ' . ($lists ? 'Success' : 'Failed') . '</p>';
        if ($lists) {
            $debug_output .= '<p>Available Lists: ' . count($lists['results']) . '</p>';
        }

        $debug_output .= '</div>';
    }

    // Handle form submission with additional logging
    if (isset($_POST[$form_id]) && wp_verify_nonce($_POST['cc_nonce'], 'cc_form_nonce')) {
        // Existing submission code...

        // Add debug logging
        if ($atts['debug'] === 'yes' && current_user_can('manage_options')) {
            error_log('Form submission data: ' . print_r($_POST, true));
            error_log('API result: ' . print_r($result, true));
        }
    }

    // Return form HTML with debug info for admins
    return $debug_output . $html;
}
Enhancing the User Experience
Creating a seamless user experience is crucial for effective email marketing integration. Here are some enhancements:
1. AJAX Form Submissions
Improve the user experience with AJAX form submissions:
// Add to your plugin class constructor
public function __construct() {
    // Existing code...

    // Register AJAX handlers
    add_action('wp_ajax_cc_subscribe', array($this, 'ajax_subscribe'));
    add_action('wp_ajax_nopriv_cc_subscribe', array($this, 'ajax_subscribe'));

    // Enqueue scripts
    add_action('wp_enqueue_scripts', array($this, 'enqueue_scripts'));
}

// Enqueue necessary scripts
public function enqueue_scripts() {
    wp_enqueue_script(
        'cc-integration',
        plugin_dir_url(__FILE__) . 'js/cc-integration.js',
        array('jquery'),
        '1.0.0',
        true
    );

    wp_localize_script('cc-integration', 'cc_ajax', array(
        'ajax_url' => admin_url('admin-ajax.php'),
        'nonce' => wp_create_nonce('cc_ajax_nonce')
    ));
}

// AJAX handler for subscriptions
public function ajax_subscribe() {
    // Verify nonce
    if (!isset($_POST['nonce']) || !wp_verify_nonce($_POST['nonce'], 'cc_ajax_nonce')) {
        wp_send_json_error(array('message' => 'Security check failed'));
    }

    // Get and validate form data
    $email = isset($_POST['email']) ? sanitize_email($_POST['email']) : '';
    if (!is_email($email)) {
        wp_send_json_error(array('message' => 'Invalid email address'));
    }

    $first_name = isset($_POST['first_name']) ? sanitize_text_field($_POST['first_name']) : '';
    $last_name = isset($_POST['last_name']) ? sanitize_text_field($_POST['last_name']) : '';
    $list_id = isset($_POST['list_id']) ? sanitize_text_field($_POST['list_id']) : '';

    // Add contact to Constant Contact
    $result = $this->add_contact($email, $first_name, $last_name, array($list_id));

    if ($result) {
        wp_send_json_success(array('message' => 'Thank you for subscribing!'));
    } else {
        wp_send_json_error(array('message' => 'There was an error. Please try again.'));
    }
}
Then create a JavaScript file (js/cc-integration.js):
jQuery(document).ready(function($) {
    $('.cc-signup-form').on('submit', function(e) {
        e.preventDefault();

        var $form = $(this);
        var $submitButton = $form.find('button[type="submit"]');
        var originalButtonText = $submitButton.text();

        // Show loading state
        $submitButton.text('Processing...').prop('disabled', true);

        // Prepare form data
        var formData = {
            action: 'cc_subscribe',
            nonce: cc_ajax.nonce,
            email: $form.find('input[name="cc_email"]').val(),
            first_name: $form.find('input[name="cc_first_name"]').val(),
            last_name: $form.find('input[name="cc_last_name"]').val(),
            list_id: $form.data('list-id')
        };

        // Submit form via AJAX
        $.post(cc_ajax.ajax_url, formData, function(response) {
            if (response.success) {
                // Show success message
                $form.html('<div class="cc-success">' + response.data.message + '</div>');
            } else {
                // Show error message
                $form.prepend('<div class="cc-error">' + response.data.message + '</div>');
                $submitButton.text(originalButtonText).prop('disabled', false);
            }
        }).fail(function() {
            // Handle AJAX failure
            $form.prepend('<div class="cc-error">There was a server error. Please try again later.</div>');
            $submitButton.text(originalButtonText).prop('disabled', false);
        });
    });
});
2. Multi-step Forms
Create more engaging sign-up experiences with multi-step forms:
// Add to your shortcode handler
public function multi_step_form_shortcode($atts) {
    // Parse attributes
    $atts = shortcode_atts(array(
        'list_id' => '',
        'success_message' => 'Thank you for subscribing!',
        'button_text' => 'Subscribe',
    ), $atts);

    // Generate unique form ID
    $form_id = 'cc_multi_form_' . uniqid();

    // Enqueue multi-step form script
    wp_enqueue_script(
        'cc-multi-step',
        plugin_dir_url(__FILE__) . 'js/cc-multi-step.js',
        array('jquery'),
        '1.0.0',
        true
    );

    // Form HTML
    $html = '<div id="' . esc_attr($form_id) . '" class="cc-multi-step-form" data-list-id="' . esc_attr($atts['list_id']) . '">';

    // Step 1
    $html .= '<div class="cc-step" data-step="1">';
    $html .= '<h3>Step 1: Basic Information</h3>';
    $html .= '<div class="cc-form-row">';
    $html .= '<label for="cc_email">Email Address (required)</label>';
    $html .= '<input type="email" name="cc_email" id="cc_email" required>';
    $html .= '</div>';
    $html .= '<button type="button" class="cc-next-step">Next Step</button>';
    $html .= '</div>';

    // Step 2
    $html .= '<div class="cc-step" data-step="2" style="display:none;">';
    $html .= '<h3>Step 2: Personal Details</h3>';
    $html .= '<div class="cc-form-row">';
    $html .= '<label for="cc_first_name">First Name</label>';
    $html .= '<input type="text" name="cc_first_name" id="cc_first_name">';
    $html .= '</div>';
    $html .= '<div class="cc-form-row">';
    $html .= '<label for="cc_last_name">Last Name</label>';
    $html .= '<input type="text" name="cc_last_name" id="cc_last_name">';
    $html .= '</div>';
    $html .= '<button type="button" class="cc-prev-step">Previous Step</button>';
    $html .= '<button type="button" class="cc-next-step">Next Step</button>';
    $html .= '</div>';

    // Step 3
    $html .= '<div class="cc-step" data-step="3" style="display:none;">';
    $html .= '<h3>Step 3: Preferences</h3>';
    $html .= '<div class="cc-form-row">';
    $html .= '<label><input type="checkbox" name="cc_preferences[]" value="news"> News and Updates</label>';
    $html .= '</div>';
    $html .= '<div class="cc-form-row">';
    $html .= '<label><input type="checkbox" name="cc_preferences[]" value="promotions"> Promotions and Offers</label>';
    $html .= '</div>';
    $html .= '<input type="hidden" name="cc_nonce" value="' . wp_create_nonce('cc_form_nonce') . '">';
    $html .= '<button type="button" class="cc-prev-step">Previous Step</button>';
    $html .= '<button type="button" class="cc-submit-form">' . esc_html($atts['button_text']) . '</button>';
    $html .= '</div>';

    // Success message container
    $html .= '<div class="cc-success-message" style="display:none;">' . esc_html($atts['success_message']) . '</div>';

    $html .= '</div>'; // Close form container

    return $html;
}
3. Personalized Content Based on Email Engagement
For advanced implementations, use Constant Contact data to personalize WordPress content:
// Add to your plugin class
public function get_contact_activity($email) {
    $encoded_email = urlencode($email);
    return $this->api_request("/contacts?email={$encoded_email}");
}

// Function to display personalized content
public function personalized_content_shortcode($atts, $content = null) {
    // Parse attributes
    $atts = shortcode_atts(array(
        'list_id' => '',
        'fallback' => 'Please subscribe to our newsletter!'
    ), $atts);

    // Check if user is logged in
    if (!is_user_logged_in()) {
        return $atts['fallback'];
    }

    // Get current user
    $current_user = wp_get_current_user();
    $email = $current_user->user_email;

    // Check if user is in specified list
    $contact_data = $this->get_contact_activity($email);

    if ($contact_data && isset($contact_data['results']) && !empty($contact_data['results'])) {
        $contact = $contact_data['results'][0];

        // Check if contact is in the specified list
        if (isset($contact['list_memberships']) && in_array($atts['list_id'], $contact['list_memberships'])) {
            return do_shortcode($content);
        }
    }

    return $atts['fallback'];
}
Integrating with Other WordPress Systems
For comprehensive WordPress integration, connect Constant Contact with other key systems:
1. WooCommerce Integration for Abandoned Carts
Recover lost sales by sending abandoned cart emails:
// Add to your plugin class constructor
public function __construct() {
    // Existing code...

    // Add WooCommerce abandoned cart tracking
    if (class_exists('WooCommerce')) {
        add_action('woocommerce_cart_updated', array($this, 'track_cart'));
        add_action('wp_login', array($this, 'check_abandoned_carts'), 10, 2);
    }
}

// Track cart contents
public function track_cart() {
    if (!is_user_logged_in() || !function_exists('WC')) {
        return;
    }

    $current_user = wp_get_current_user();
    $cart = WC()->cart;

    if ($cart->is_empty()) {
        delete_user_meta($current_user->ID, 'cc_abandoned_cart');
        return;
    }

    // Store cart data
    $cart_data = array(
        'contents' => $cart->get_cart_contents(),
        'total' => $cart->get_cart_contents_total(),
        'timestamp' => time(),
        'email' => $current_user->user_email
    );

    update_user_meta($current_user->ID, 'cc_abandoned_cart', $cart_data);
}

// Check for abandoned carts on login
public function check_abandoned_carts($user_login, $user) {
    // Get abandoned cart data
    $cart_data = get_user_meta($user->ID, 'cc_abandoned_cart', true);

    if (!$cart_data || empty($cart_data['contents'])) {
        return;
    }

    // Check if cart is abandoned (more than 1 hour old)
    if (time() - $cart_data['timestamp'] < 3600) {
        return;
    }

    // Send abandoned cart email via Constant Contact
    $this->send_abandoned_cart_email($cart_data);

    // Clear abandoned cart data
    delete_user_meta($user->ID, 'cc_abandoned_cart');
}

// Send abandoned cart email
public function send_abandoned_cart_email($cart_data) {
    // Implement this based on your Constant Contact campaign creation needs
    // This would typically involve creating a custom email using the API
    // or adding the user to a specific abandoned cart automated series
}
2. Membership Plugin Integration
For sites using membership plugins, sync membership status with Constant Contact:
// Example for MemberPress integration
// Add to your plugin class constructor
public function __construct() {
    // Existing code...

    // Add MemberPress integration if active
    if (class_exists('MeprUser')) {
        add_action('mepr-signup', array($this, 'sync_new_member'), 10, 1);
        add_action('mepr-transition-status', array($this, 'handle_status_change'), 10, 3);
    }
}

// Sync new member to Constant Contact
public function sync_new_member($event) {
    $user = $event->user;
    $membership = $event->product;

    if (!$user || !$membership) {
        return;
    }

    $email = $user->user_email;
    $first_name = $user->first_name;
    $last_name = $user->last_name;

    // Get list ID for this membership level
    $list_id = $this->get_list_for_membership($membership->ID);

    if (!$list_id) {
        return;
    }

    // Add to Constant Contact with membership custom field
    $this->add_contact($email, $first_name, $last_name, array($list_id));
}

// Handle membership status changes
public function handle_status_change($old_status, $new_status, $subscription) {
    $user = get_user_by('id', $subscription->user_id);
    $membership = $subscription->product();

    if (!$user || !$membership) {
        return;
    }

    $email = $user->user_email;

    // Get appropriate lists based on new status
    $active_list_id = $this->get_list_for_membership($membership->ID);
    $expired_list_id = $this->get_list_for_expired_members();

    // Update list memberships based on new status
    if ($new_status == 'active' && $active_list_id) {
        // Add to active members list, remove from expired if applicable
        $this->update_contact_lists($email, array($active_list_id), $expired_list_id ? array($expired_list_id) : array());
    } elseif (($new_status == 'expired' || $new_status == 'cancelled') && $expired_list_id) {
        // Add to expired members list, remove from active
        $this->update_contact_lists($email, array($expired_list_id), $active_list_id ? array($active_list_id) : array());
    }
}

// Get list ID for a specific membership level
private function get_list_for_membership($membership_id) {
    // Map membership IDs to Constant Contact list IDs
    // This could be stored in options or as post meta
    $membership_lists = get_option('cc_membership_lists', array());

    return isset($membership_lists[$membership_id]) ? $membership_lists[$membership_id] : false;
}
Measuring Success and ROI
Track the effectiveness of your Constant Contact integration:
// Add to your plugin class
public function get_subscription_metrics($days = 30) {
    global $wpdb;

    $metrics = array(
        'total_subscribers' => 0,
        'new_subscribers' => 0,
        'conversion_rate' => 0,
        'sources' => array()
    );

    // Get total subscribers from transient cache
    $total = get_transient('cc_total_subscribers');

    if ($total === false) {
        // If not cached, get from API
        $lists = $this->get_contact_lists();

        if ($lists && isset($lists['results'])) {
            foreach ($lists['results'] as $list) {
                $metrics['total_subscribers'] += $list['membership_count'];
            }
        }

        // Cache for 1 day
        set_transient('cc_total_subscribers', $metrics['total_subscribers'], DAY_IN_SECONDS);
    } else {
        $metrics['total_subscribers'] = $total;
    }

    // Get new subscribers from database
    $thirty_days_ago = date('Y-m-d H:i:s', strtotime("-{$days} days"));

    $new_subscribers = $wpdb->get_var($wpdb->prepare(
        "SELECT COUNT(*) FROM {$wpdb->prefix}cc_subscribers
         WHERE subscribe_date >= %s",
        $thirty_days_ago
    ));

    $metrics['new_subscribers'] = $new_subscribers ? $new_subscribers : 0;

    // Get conversion data
    $form_conversions = $wpdb->get_results($wpdb->prepare(
        "SELECT form_id, COUNT(*) as count
         FROM {$wpdb->prefix}cc_subscribers
         WHERE subscribe_date >= %s
         GROUP BY form_id",
        $thirty_days_ago
    ));

    if ($form_conversions) {
        foreach ($form_conversions as $conversion) {
            $form_name = get_post_meta($conversion->form_id, 'cc_form_name', true);
            $metrics['sources'][$form_name ? $form_name : "Form #{$conversion->form_id}"] = $conversion->count;
        }
    }

    // Calculate overall conversion rate if we have impression data
    $total_impressions = get_option('cc_form_impressions_' . $days, 0);

    if ($total_impressions > 0) {
        $metrics['conversion_rate'] = round(($metrics['new_subscribers'] / $total_impressions) * 100, 2);
    }

    return $metrics;
}
Conclusion: Building a Comprehensive Constant Contact Integration
Integrating Constant Contact with WordPress through the API offers tremendous potential for enhancing your email marketing efforts. From simple form integrations to sophisticated automation workflows, the possibilities are extensive.
As we’ve explored in this guide, a well-implemented Constant Contact API integration can:
- Streamline lead generation by capturing website visitors through strategically placed forms
- Enhance customer segmentation by synchronizing WordPress user data with Constant Contact lists
- Automate marketing workflows based on user behavior and purchase history
- Personalize content experiences using email engagement data
- Improve conversion rates through targeted messaging and abandoned cart recovery
- Provide valuable analytics on your email marketing performance
While there are simpler integration methods available through plugins, a custom API implementation offers unparalleled flexibility and control. For businesses with specific requirements or complex workflows, the development investment can yield significant returns in marketing effectiveness and operational efficiency.
Whether you choose to implement these solutions yourself or work with a WordPress Expert for Hire, the integration between WordPress and Constant Contact represents a powerful combination for digital marketing success.
At Jackober, we’ve implemented numerous Constant Contact integrations for clients across various industries. If you need assistance with your specific integration needs, our team of WordPress specialists can help you design and implement a solution tailored to your business objectives.
For more insights on WordPress development and integration possibilities, explore our other expert guides or contact us to discuss your specific email marketing integration needs.