

Website speed isn’t just a luxury—it’s a necessity. As a professional WordPress developer with years of experience optimizing websites for performance, I can tell you that implementing a Content Delivery Network (CDN) is one of the most effective ways to dramatically improve your WordPress site’s loading times, user experience, and even search engine rankings.
In this comprehensive guide, I’ll walk you through everything you need to know about setting up a CDN for your WordPress website in 2026, from understanding the fundamentals to advanced implementation techniques that will give your site the competitive edge it deserves.
Understanding Content Delivery Networks (CDNs)
Before diving into implementation, let’s establish a solid understanding of what CDNs are and how they benefit WordPress sites.
What is a CDN?
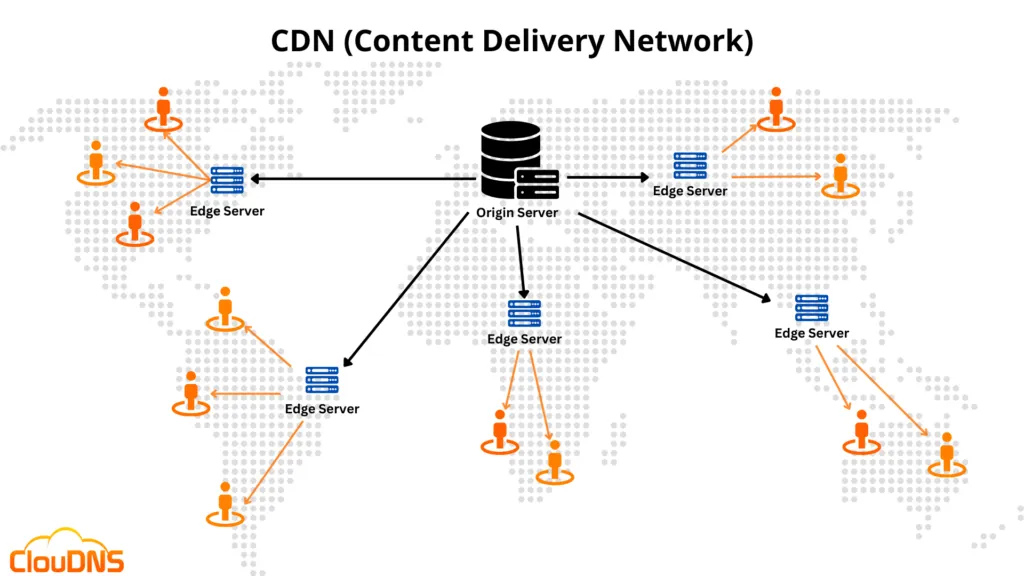
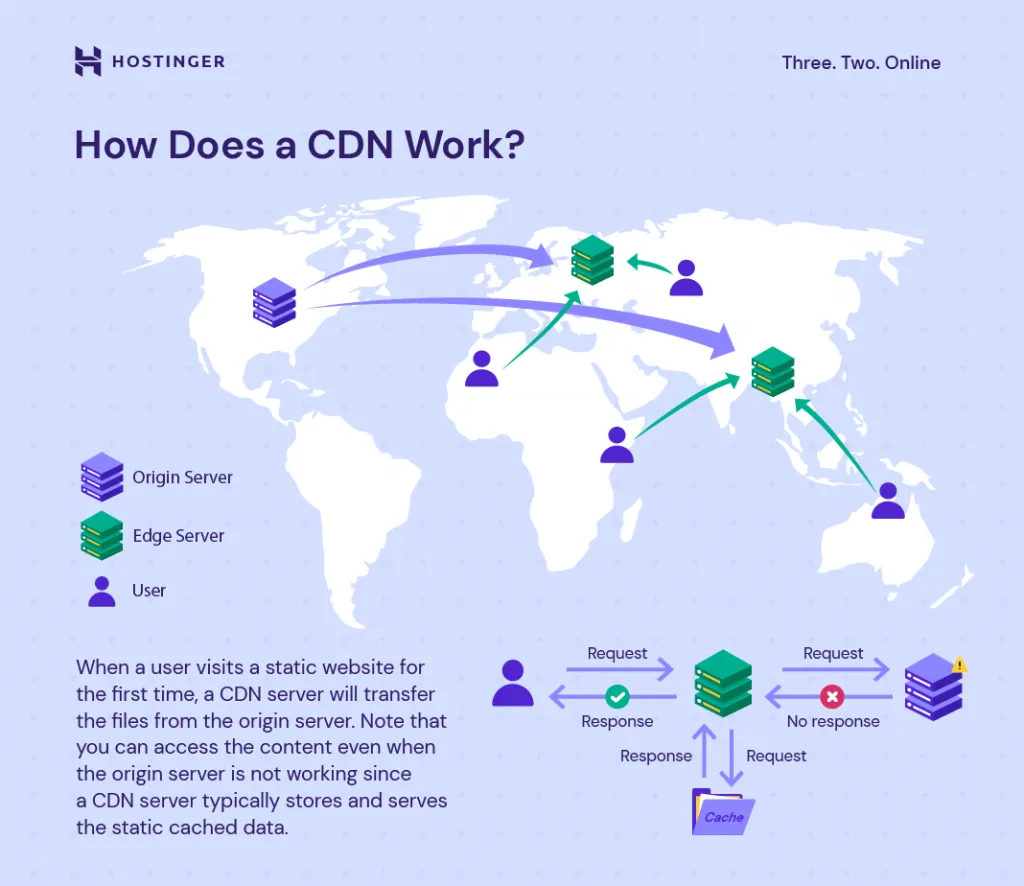
A Content Delivery Network is a distributed network of servers strategically positioned in multiple geographic locations around the world. These servers store cached copies of your website’s static content—images, CSS files, JavaScript, videos, and other assets that don’t change frequently.
When a visitor accesses your website, the CDN delivers these static files from the server closest to their physical location, rather than from your origin server (where your WordPress installation lives). This proximity dramatically reduces latency and load times.
Why WordPress Sites Need a CDN
WordPress powers approximately 43% of all websites on the internet, making it the most popular content management system worldwide. However, this popularity comes with challenges:
- Resource-Intensive Nature: WordPress sites, especially those using WordPress page builders or complex themes, can be resource-intensive.
- Global Audience: If your hosting server is in the United States but you have visitors from Asia or Europe, those distant visitors will experience slower loading times without a CDN.
- Media-Heavy Content: Modern WordPress sites often contain numerous images, videos, and other media files that can slow down page loading.
- Plugin Overhead: Each plugin you add to your WordPress site typically adds JavaScript and CSS files, increasing load times.
- Mobile Optimization: With mobile traffic accounting for over 50% of global web traffic, speed optimization becomes even more critical on slower mobile connections.
Key Benefits of Using a CDN with WordPress
Implementing a CDN for your WordPress site offers numerous advantages:
1. Improved Page Load Speed
CDNs can reduce page load times by 50-70% by serving content from servers closer to your visitors. This is particularly important for e-commerce WordPress sites, where a 1-second delay in page response can result in a 7% reduction in conversions.
2. Reduced Server Load
By offloading static content delivery to the CDN, your origin server experiences less strain, which means better performance for dynamic content processing.
3. Better SEO Performance
Google and other search engines consider page speed as a ranking factor. Faster-loading sites tend to rank higher in search results, making a CDN an important component of your SEO strategy.
4. Enhanced User Experience
Faster websites provide a better user experience, leading to lower bounce rates and higher engagement metrics.
5. Improved Reliability and Uptime
CDNs offer built-in redundancy. If one server in the network fails, traffic is automatically routed to another, ensuring your content remains available.
6. DDoS Protection
Many CDN providers include DDoS (Distributed Denial of Service) protection features, adding an extra layer of security to your WordPress site.
Preparing Your WordPress Site for CDN Integration
Before implementing a CDN, it’s important to prepare your WordPress site properly:
1. Ensure HTTPS Implementation
Most CDNs require HTTPS for optimal performance and security. If you haven’t already, follow my guide on how to add SSL to WordPress to secure your site with HTTPS.
2. Optimize Your Images
Before pushing your content to a CDN, optimize your images to reduce their file size without compromising quality. Check out my detailed guide on how to optimize images for WordPress for step-by-step instructions.
3. Implement Caching
A good caching solution works hand-in-hand with your CDN. Consider implementing one of the best WordPress cache plugins to maximize performance benefits.
4. Clean Up Your WordPress Database
A bloated database can slow down your site regardless of CDN implementation. Follow my WordPress database optimization guide to ensure your database is lean and efficient.
5. Audit Your Theme and Plugins
Minimize the number of plugins and ensure your theme is optimized for performance. Sometimes, switching to a lighter theme can make a significant difference. If you’re looking for efficient options, check out my collection of free WordPress themes for blogs.
Choosing the Right CDN for Your WordPress Site
With numerous CDN providers available, selecting the right one for your WordPress site can be challenging. Here’s what to consider:
Key Factors to Evaluate
1. Global Presence
The more Points of Presence (PoPs) a CDN has worldwide, especially in regions where your audience is located, the better performance you’ll achieve.
2. WordPress Integration
Some CDNs offer dedicated WordPress plugins or integrations that simplify setup and management.
3. Pricing Structure
CDN pricing models vary significantly:
- Pay-as-you-go (based on bandwidth usage)
- Tiered monthly plans
- Free tiers with limitations
- Enterprise custom pricing
4. Performance Features
Look for features like:
- HTTP/3 support
- Brotli compression
- Image optimization
- Video streaming capabilities
- Smart caching rules
5. Security Features
Many CDNs offer security benefits:
- Web Application Firewall (WAF)
- DDoS protection
- Bot management
- SSL/TLS encryption
6. Support Quality
Evaluate the level of technical support provided, especially if you’re new to CDN implementation.
Popular CDN Providers for WordPress in 2026
Let’s examine some leading CDN options for WordPress sites:
Cloudflare
Pros:
- Generous free tier
- Extensive global network
- Integrated security features
- Easy WordPress implementation
- Automatic platform optimization for WordPress
Cons:
- Advanced features require paid plans
- Can be complex to configure optimally
Bunny.net (formerly BunnyCDN)
Pros:
- Affordable pay-as-you-go pricing
- User-friendly interface
- Excellent performance metrics
- WordPress-specific optimizations
- Simple implementation
Cons:
- Fewer advanced features than some competitors
- Smaller network than major providers (though still substantial)
Amazon CloudFront
Pros:
- Massive global infrastructure
- Highly customizable
- Scales effortlessly for large sites
- Pay-only-for-what-you-use model
- Integration with other AWS services
Cons:
- More complex setup process
- Can become expensive with high traffic
- Requires technical knowledge to optimize
Stackpath (formerly MaxCDN)
Pros:
- WordPress-friendly with dedicated plugins
- Good balance of features and usability
- Strong security focus
- Predictable pricing
Cons:
- Not as extensive global coverage as some competitors
- Higher starting price point
KeyCDN
Pros:
- Developer-friendly
- Transparent pay-as-you-go pricing
- Good WordPress integration
- RESTful API
- Image processing features
Cons:
- Smaller network than major providers
- Less name recognition
Cloudinary (for media-focused CDN)
Pros:
- Specialized in image and video optimization
- Automatic responsive images
- Advanced media transformations
- WordPress plugin available
Cons:
- Focused primarily on media (not a full-site CDN)
- Can get expensive with high media usage
Step-by-Step CDN Implementation for WordPress
Now, let’s walk through the process of implementing a CDN for your WordPress site:
Method 1: Using Cloudflare (DNS-level CDN)
Cloudflare is unique because it functions as a reverse proxy at the DNS level, making it one of the easiest CDNs to implement.
First, Step 1: Sign up for Cloudflare
- Create an account at Cloudflare.com
- Add your website to Cloudflare
- Cloudflare will scan your DNS records
Step 2: Update your nameservers
- Cloudflare will provide you with custom nameservers
- Log in to your domain registrar where you purchased your domain name
- Replace your current nameservers with Cloudflare’s nameservers
- This change can take 24-48 hours to propagate fully
Third, Step 3: Configure Cloudflare settings
- In your Cloudflare dashboard, go to the “Speed” tab
- Enable Auto Minify for HTML, CSS, and JavaScript
- Enable Brotli compression
- If you have a WordPress site, enable Automatic Platform Optimization for WordPress
Step 4: Install the Cloudflare WordPress plugin (optional but recommended)
- In your WordPress dashboard, go to Plugins > Add New
- Search for “Cloudflare”
- Install and activate the official Cloudflare plugin
- Configure the plugin with your Cloudflare API key for enhanced integration
Step 5: Test your setup
- Use tools like GTmetrix or PageSpeed Insights to compare your site’s performance before and after implementation
- Check that your content is being served via Cloudflare by looking for Cloudflare headers in your browser’s developer tools
Method 2: Using a Traditional CDN with WordPress Plugins
For traditional CDNs like Bunny.net, KeyCDN, or Amazon CloudFront, the implementation process is slightly different:
Step 1: Sign up for your chosen CDN service
- Create an account with your preferred CDN provider
- Set up a “pull zone” or “distribution” (terminology varies by provider)
- Configure the origin (your WordPress site’s URL)
- Note your CDN URL (e.g.,
d1234abcd.cloudfront.netoryour-site.b-cdn.net)
Step 2: Install a CDN enabler plugin
Several WordPress plugins can help integrate your CDN:
Option A: CDN Enabler
- Install and activate the CDN Enabler plugin
- Go to Settings > CDN Enabler
- Enter your CDN URL
- Select the file types to be served via CDN
- Save changes
Second, Option B: WP Rocket (premium)
- Install and activate WP Rocket
- Go to WP Rocket > CDN
- Enable the CDN option
- Enter your CDN URL
- Save changes
Option C: W3 Total Cache
- Install and activate W3 Total Cache
- Go to Performance > CDN
- Select your CDN type
- Enter the required credentials
- Configure which files to serve via CDN
- Save changes
Step 3: Test your implementation
- Check your website’s source code to verify that static assets are being loaded from your CDN URL
- Use browser developer tools to confirm that images, CSS, and JavaScript files are being served from the CDN
- Test your site’s speed using performance testing tools
Method 3: Manual CDN Integration (Advanced)
For developers comfortable with code, manual integration provides more control:
Step 1: Set up your CDN account and distribution
Follow the same initial steps as in Method 2 to create your CDN distribution.
Step 2: Modify your WordPress theme
Add the following code to your theme’s functions.php file or a custom plugin:
function cdn_url($url) {
    // Define CDN URL
    $cdn_url = 'https://your-cdn-url.com';

    // Get your WordPress site URL
    $site_url = get_site_url();

    // Files to include
    $include_files = array('.jpg', '.jpeg', '.png', '.gif', '.css', '.js');

    // Check if the URL should be CDN-enabled
    $should_cdn = false;
    foreach($include_files as $file) {
        if(strpos($url, $file) !== false) {
            $should_cdn = true;
            break;
        }
    }

    // Replace the URL if it should be CDN-enabled
    if($should_cdn) {
        return str_replace($site_url, $cdn_url, $url);
    }

    return $url;
}

// Apply the function to relevant WordPress hooks
add_filter('wp_get_attachment_url', 'cdn_url');
add_filter('style_loader_src', 'cdn_url');
add_filter('script_loader_src', 'cdn_url');
add_filter('wp_calculate_image_srcset', function($sources) {
    foreach($sources as &$source) {
        $source['url'] = cdn_url($source['url']);
    }
    return $sources;
});
Customize this code to match your specific CDN setup and requirements.
Step 3: Test thoroughly
After implementing manual integration, test extensively across different pages and post types to ensure all assets are being correctly served from your CDN.
Advanced CDN Strategies for WordPress

Once you have basic CDN implementation working, consider these advanced strategies:
1. Implementing HTTP/3 and QUIC
HTTP/3 is the latest version of the HTTP protocol, built on QUIC (Quick UDP Internet Connections). It offers significant performance improvements, especially for mobile users with unstable connections.
Many premium CDNs now support HTTP/3. To implement:
- Check if your CDN provider supports HTTP/3
- Enable HTTP/3 in your CDN dashboard
- Ensure your origin server also supports HTTP/3 for optimal performance
2. Image Optimization at the CDN Level
Some CDNs offer automatic image optimization:
- Enable image optimization in your CDN dashboard
- Configure quality levels and formats (WebP, AVIF)
- Set up responsive images delivery
For example, with Cloudflare, you can enable Polish for automatic image optimization and Mirage for responsive images.
3. Dynamic Content Acceleration
While CDNs traditionally focus on static content, modern CDNs can also accelerate dynamic content:
- Look for “Dynamic Content Acceleration” or similar features in your CDN
- Enable edge computing capabilities if available
- Use edge caching for semi-dynamic content with appropriate cache headers
4. Implementing Preconnect and DNS Prefetch
Add these tags to your site’s header to establish early connections to your CDN:
<link rel="preconnect" href="https://your-cdn-domain.com">
<link rel="dns-prefetch" href="https://your-cdn-domain.com">
You can add this through your theme’s header.php file or using a plugin like WP Rocket or Autoptimize.
5. Geolocation and Personalization with CDNs
Modern CDNs can help deliver location-specific content:
- Use your CDN’s edge computing capabilities
- Set up country or region-specific caching rules
- Implement A/B testing at the edge
This is particularly useful for multinational e-commerce sites or sites using WordPress translation plugins.
Optimizing WordPress for CDN Performance
To maximize your CDN benefits, optimize your WordPress site accordingly:
1. Implement Browser Caching
Set appropriate cache headers for different types of content:
// Add to .htaccess file
<IfModule mod_expires.c>
  ExpiresActive On
  ExpiresByType image/jpg "access plus 1 year"
  ExpiresByType image/jpeg "access plus 1 year"
  ExpiresByType image/gif "access plus 1 year"
  ExpiresByType image/png "access plus 1 year"
  ExpiresByType image/webp "access plus 1 year"
  ExpiresByType text/css "access plus 1 month"
  ExpiresByType application/javascript "access plus 1 month"
  ExpiresByType text/javascript "access plus 1 month"
  ExpiresByType text/html "access plus 1 day"
  ExpiresDefault "access plus 1 week"
</IfModule>
2. Minify and Combine Files
Reduce the number of HTTP requests by combining and minifying CSS and JavaScript files. You can use plugins like Autoptimize or WP Rocket for this purpose.
3. Implement Lazy Loading
Lazy loading delays the loading of images and videos until they’re about to enter the viewport. WordPress has native lazy loading, but you can enhance it with WordPress lazy load implementation techniques.
4. Use WebP Images
WebP images are typically 25-35% smaller than comparable JPEG or PNG files. Many CDNs can automatically convert your images to WebP for supported browsers.
5. Optimize Your WordPress Database
A slow database can negate CDN benefits for dynamic content. Regularly optimize your database using my WordPress database optimization guide.
Monitoring and Troubleshooting Your WordPress CDN
After implementing your CDN, ongoing monitoring is essential:
Tools for Monitoring CDN Performance
- GTmetrix: Provides detailed performance metrics and waterfall charts
- Pingdom: Offers real-time monitoring and alerts
- Google PageSpeed Insights: Gives performance scores and improvement suggestions
- WebPageTest: Allows testing from multiple locations worldwide
- Your CDN’s analytics dashboard: Provides CDN-specific metrics
Common CDN Issues and Solutions
Issue 1: Mixed Content Warnings
Symptoms: Security warnings in the browser console, “not secure” indicators
Cause: Some resources still loading via HTTP instead of HTTPS
Solution: Use a plugin like Better Search Replace to update all URLs, or implement proper WordPress database search and replace techniques.
Issue 2: Incorrect Asset Paths
Symptoms: Broken images or styles
Cause: Hardcoded absolute URLs bypassing the CDN
Solution: Update your theme and plugins to use WordPress functions like wp_enqueue_style() and wp_enqueue_script() instead of hardcoded URLs.
Issue 3: Cache Invalidation Problems
Symptoms: Content updates not appearing on the live site
Cause: CDN caching old versions of files
Solution: Implement proper cache busting techniques, such as version parameters in file URLs, and set up a cache purge mechanism through your CDN’s API.
Issue 4: Origin Shield Overload
Symptoms: Origin server experiencing high load despite CDN
Cause: Multiple CDN edge nodes requesting the same content from origin
Solution: Enable “Origin Shield” or similar feature in your CDN to create an intermediate caching layer.
Issue 5: Geo-restriction Issues
Symptoms: Content inaccessible in certain regions
Cause: CDN geo-restriction settings or regional blocking
Solution: Review and adjust your CDN’s geo-restriction settings, or implement proper region-specific redirects.
CDN Implementation for Special WordPress Cases
Different types of WordPress sites may require specialized CDN approaches:
E-commerce Sites
For sites built with WooCommerce or other e-commerce WordPress solutions:
- Exclude checkout and cart pages from caching
- Implement edge computing for inventory and pricing updates
- Use image CDN features for product galleries
- Consider specialized e-commerce CDNs with PCI compliance features
- Set up proper cache invalidation for product updates
Membership Sites
If you’re running a membership site with WordPress membership plugins:
- Configure cookie-based cache exclusions for logged-in users
- Implement edge authentication if your CDN supports it
- Use CDN-level access controls for protected content
- Consider dynamic content acceleration for personalized member experiences
High-Traffic Media Sites
For media-heavy sites like those using magazine WordPress themes:
- Implement video streaming optimizations
- Use adaptive bitrate delivery for videos
- Set up image optimization pipelines
- Consider multi-CDN strategies for redundancy
- Implement content preloading for popular articles
Multilingual Sites
For sites using WordPress translation plugins:
- Configure geo-based content delivery
- Set up language-specific caching rules
- Implement proper Vary headers for language-dependent content
- Use edge computing for language detection and redirection
Case Studies: Real-World WordPress CDN Implementations
Let’s examine some real-world examples of successful WordPress CDN implementations:
Case Study 1: E-commerce Performance Optimization
Client: Medium-sized online store with 5,000+ products
Challenge: Slow page load times, especially for product images
Solution:
- Implemented Cloudflare with image optimization
- Set up edge caching for product pages with 1-hour TTL
- Excluded cart and checkout pages
- Implemented WebP image delivery
- Added automatic purging on product updates
Results:
- 65% reduction in page load times
- 23% increase in conversion rate
- 40% reduction in origin server load
- 15% decrease in bounce rate
Case Study 2: Global Media Website
Client: News website with audiences across multiple continents
Challenge: Inconsistent performance across regions, high origin costs
Solution:
- Multi-CDN setup with regional routing
- Aggressive caching of article pages (24-hour TTL)
- Real-time cache purging via webhooks
- Video optimization with adaptive streaming
- Edge computing for personalized content recommendations
Results:
- 78% improvement in global TTFB (Time To First Byte)
- 50% reduction in bandwidth costs
- Consistent sub-2-second load times worldwide
- Improved search engine rankings in international markets
Case Study 3: Membership Learning Platform
Client: Online course provider with video-based learning materials
Challenge: Secure delivery of premium content, video buffering issues
Solution:
- Specialized video CDN implementation
- Tokenized access for secured content
- Dynamic watermarking at the edge
- Adaptive bitrate streaming
- Regional content caching based on student locations
Results:
- 90% reduction in video start time
- 70% decrease in buffering events
- Enhanced content security
- Improved student satisfaction metrics
- Ability to scale to 3x more concurrent users
The Future of WordPress CDN Integration
Looking ahead, several trends are shaping the future of WordPress CDN usage:
Edge Computing and Serverless WordPress
Edge computing allows code execution at CDN edge locations, enabling dynamic content generation without accessing the origin server. This is evolving toward “serverless WordPress” architectures where most functionality runs at the edge.
AI-Powered Content Optimization
CDNs are beginning to implement AI for automatic content optimization:
- Predictive preloading of content
- User-specific caching strategies
- Automatic image format and quality selection
- Real-time performance adjustments
Integration with Headless WordPress
As headless CMS vs WordPress architectures gain popularity, CDNs are becoming even more critical as the delivery layer for decoupled front-ends, often implemented with frameworks like React, Vue, or Next.js.
Enhanced Security Features
CDNs are expanding their security capabilities:
- Advanced bot detection
- API security
- Client-side protection against data theft
- Enhanced DDoS mitigation
Sustainability Optimization
CDNs are beginning to offer carbon-aware routing and green hosting options, optimizing not just for performance but also for environmental impact.
Conclusion: Implementing Your WordPress CDN Strategy
A well-implemented CDN is no longer optional for WordPress sites aiming for optimal performance. As we’ve seen, the benefits extend far beyond simple speed improvements to include enhanced security, reduced costs, improved user experience, and better SEO performance.
To implement an effective WordPress CDN strategy:
- Start with site optimization: Ensure your WordPress site is already optimized with proper WordPress page speed optimization techniques before adding a CDN.
- Choose the right CDN provider: Consider your specific needs, traffic patterns, audience locations, and budget when selecting a CDN.
- Implement methodically: Follow the step-by-step guidelines provided in this article, testing thoroughly at each stage.
- Monitor and refine: Use analytics tools to continually monitor performance and make adjustments as needed.
- Stay updated: CDN technology evolves rapidly, so keep informed about new features and capabilities from your provider.
Remember that CDN implementation is not a one-time task but an ongoing process of optimization. As your WordPress site grows and evolves, your CDN strategy should evolve with it.
If you need personalized assistance with implementing a CDN for your WordPress site, don’t hesitate to reach out to me as a WordPress expert for hire. With years of experience optimizing WordPress sites for performance, I can help you achieve the fastest possible experience for your users.
Have you implemented a CDN for your WordPress site? What challenges did you face, and what benefits have you seen? Share your experiences in the comments below!
This guide is regularly updated to reflect the latest CDN technologies and WordPress best practices. Last updated: January 2026.
Great post! Really appreciated the way you explained this. Looking forward to more content like this!