
WordPress Custom Post Types Tutorial: A Complete Guide for 2025
As a professional WordPress developer with years of experience building custom solutions, I’ve found that mastering custom post types (CPTs) is essential for creating truly powerful and flexible WordPress websites. Custom post types transform WordPress from a simple blogging platform into a robust content management system capable of handling virtually any type of content.
In this tutorial, I’ll walk you through everything you need to know about WordPress custom post types – from understanding the basics to implementing advanced functionality that will elevate your WordPress development skills.
What Are WordPress Custom Post Types?
WordPress comes with several default post types out of the box – Posts, Pages, Attachments, Revisions, and Menus. While these cover basic content needs, they’re limited when you need to manage specialized content types with unique characteristics.
Custom post types allow you to create and manage entirely new content types beyond the WordPress defaults. Think of them as specialized containers for specific types of content, each with its own set of rules, fields, and presentation options.
Common Use Cases for Custom Post Types
Before diving into the technical aspects, let’s explore some practical applications:
- Portfolio items for creative professionals
- Products for e-commerce sites (though WooCommerce handles this with its own CPT)
- Team members for company websites
- Events for calendars and scheduling
- Testimonials for showcasing client feedback
- Real estate listings for property websites
- Recipes for food blogs
- Case studies for agencies
- Courses for educational platforms
- Projects for construction websites
Custom post types can transform how you manage content on your WordPress site, making it easier to organize, display, and maintain specialized information without hacking the default post types.
Benefits of Using Custom Post Types
1. Improved Content Organization
By separating different content types, you create a cleaner admin interface and more logical content structure. This is particularly valuable for sites with diverse content needs.
2. Enhanced User Experience
Custom post types simplify content management for clients and content editors. Instead of explaining complex category systems or custom fields on regular posts, you can provide dedicated sections for specific content types.
3. Better Development Control
As a developer, custom post types give you precise control over how content is created, displayed, and managed. You can customize the admin UI, validation rules, and frontend presentation for each content type.
4. SEO Advantages
With custom post types, you can implement specialized SEO strategies for different content types. For example, your product CPT might have different metadata requirements than your case studies CPT. This level of granularity can improve your WordPress SEO efforts.
5. Future-Proof Architecture
A well-structured WordPress site with appropriate custom post types is easier to maintain, expand, and adapt as business requirements change.
Creating a Basic Custom Post Type
Let’s start with the fundamentals of registering a custom post type in WordPress. There are two primary methods: using code (the developer approach) or using plugins (the no-code approach).
Method 1: Registering a Custom Post Type with Code
The most flexible way to create custom post types is by adding code to your theme’s functions.php file or, preferably, to a site-specific plugin. Here’s a basic example of registering a “Portfolio” custom post type:
// Register Custom Post Type
function create_portfolio_cpt() {
    $labels = array(
        'name'                  => _x( 'Portfolio Items', 'Post Type General Name', 'text_domain' ),
        'singular_name'         => _x( 'Portfolio Item', 'Post Type Singular Name', 'text_domain' ),
        'menu_name'             => __( 'Portfolio', 'text_domain' ),
        'name_admin_bar'        => __( 'Portfolio Item', 'text_domain' ),
        'archives'              => __( 'Portfolio Archives', 'text_domain' ),
        'attributes'            => __( 'Portfolio Attributes', 'text_domain' ),
        'parent_item_colon'     => __( 'Parent Item:', 'text_domain' ),
        'all_items'             => __( 'All Items', 'text_domain' ),
        'add_new_item'          => __( 'Add New Item', 'text_domain' ),
        'add_new'               => __( 'Add New', 'text_domain' ),
        'new_item'              => __( 'New Item', 'text_domain' ),
        'edit_item'             => __( 'Edit Item', 'text_domain' ),
        'update_item'           => __( 'Update Item', 'text_domain' ),
        'view_item'             => __( 'View Item', 'text_domain' ),
        'view_items'            => __( 'View Items', 'text_domain' ),
        'search_items'          => __( 'Search Item', 'text_domain' ),
        'not_found'             => __( 'Not found', 'text_domain' ),
        'not_found_in_trash'    => __( 'Not found in Trash', 'text_domain' ),
        'featured_image'        => __( 'Featured Image', 'text_domain' ),
        'set_featured_image'    => __( 'Set featured image', 'text_domain' ),
        'remove_featured_image' => __( 'Remove featured image', 'text_domain' ),
        'use_featured_image'    => __( 'Use as featured image', 'text_domain' ),
        'insert_into_item'      => __( 'Insert into item', 'text_domain' ),
        'uploaded_to_this_item' => __( 'Uploaded to this item', 'text_domain' ),
        'items_list'            => __( 'Items list', 'text_domain' ),
        'items_list_navigation' => __( 'Items list navigation', 'text_domain' ),
        'filter_items_list'     => __( 'Filter items list', 'text_domain' ),
    );

    $args = array(
        'label'                 => __( 'Portfolio Item', 'text_domain' ),
        'description'           => __( 'Portfolio work items', 'text_domain' ),
        'labels'                => $labels,
        'supports'              => array( 'title', 'editor', 'thumbnail', 'excerpt' ),
        'taxonomies'            => array( 'category', 'post_tag' ),
        'hierarchical'          => false,
        'public'                => true,
        'show_ui'               => true,
        'show_in_menu'          => true,
        'menu_position'         => 5,
        'menu_icon'             => 'dashicons-portfolio',
        'show_in_admin_bar'     => true,
        'show_in_nav_menus'     => true,
        'can_export'            => true,
        'has_archive'           => true,
        'exclude_from_search'   => false,
        'publicly_queryable'    => true,
        'capability_type'       => 'page',
        'show_in_rest'          => true,
    );

    register_post_type( 'portfolio', $args );
}
add_action( 'init', 'create_portfolio_cpt', 0 );
This code should be added to your theme’s functions.php file or, better yet, a custom plugin. Let’s break down the key components:
Key Arguments for register_post_type()
- labels: Defines all the text labels used in the admin interface
- supports: Specifies which features the post type supports (title, editor, thumbnails, etc.)
- taxonomies: Associates existing taxonomies with your CPT
- hierarchical: Determines if the post type can have parent-child relationships (like pages)
- public: Makes the post type visible to users and in the admin
- menu_icon: Sets the icon in the admin menu (using WordPress Dashicons)
- has_archive: Enables an archive page for the post type
- show_in_rest: Enables Gutenberg editor support
Method 2: Using a Plugin to Create Custom Post Types
If you prefer a no-code approach, several excellent plugins can help you create and manage custom post types:
- Custom Post Type UI (CPTUI) – A user-friendly plugin with a simple interface for creating CPTs and taxonomies
- Pods – A more comprehensive solution that adds custom post types and much more
- Toolset Types – Part of the Toolset suite, offering CPT creation with advanced field management
For beginners or those who prefer visual interfaces, I recommend starting with Custom Post Type UI. It provides all the essential options without requiring code knowledge.
Advanced Custom Post Type Features
Now that we understand the basics, let’s explore some more advanced features and customizations.
Custom Taxonomies
Custom taxonomies allow you to create specialized classification systems for your custom post types. Think of them as custom categories or tags specifically designed for your content type.
Here’s an example of creating a “Project Type” taxonomy for our Portfolio CPT:
function create_portfolio_taxonomies() {
    // Project Type Taxonomy
    $labels = array(
        'name'              => _x( 'Project Types', 'taxonomy general name', 'text_domain' ),
        'singular_name'     => _x( 'Project Type', 'taxonomy singular name', 'text_domain' ),
        'search_items'      => __( 'Search Project Types', 'text_domain' ),
        'all_items'         => __( 'All Project Types', 'text_domain' ),
        'parent_item'       => __( 'Parent Project Type', 'text_domain' ),
        'parent_item_colon' => __( 'Parent Project Type:', 'text_domain' ),
        'edit_item'         => __( 'Edit Project Type', 'text_domain' ),
        'update_item'       => __( 'Update Project Type', 'text_domain' ),
        'add_new_item'      => __( 'Add New Project Type', 'text_domain' ),
        'new_item_name'     => __( 'New Project Type Name', 'text_domain' ),
        'menu_name'         => __( 'Project Types', 'text_domain' ),
    );

    $args = array(
        'hierarchical'      => true, // Like categories (true) or tags (false)
        'labels'            => $labels,
        'show_ui'           => true,
        'show_admin_column' => true,
        'query_var'         => true,
        'rewrite'           => array( 'slug' => 'project-type' ),
        'show_in_rest'      => true,
    );

    register_taxonomy( 'project_type', array( 'portfolio' ), $args );
}
add_action( 'init', 'create_portfolio_taxonomies', 0 );
This code creates a hierarchical taxonomy (like categories) specifically for our Portfolio custom post type.
Custom Meta Boxes and Fields
To truly leverage custom post types, you’ll want to add custom fields specific to each content type. While WordPress has a basic custom fields interface, most developers use one of these solutions:
Also Read:
- Advanced Custom Fields (ACF) – The most popular solution for adding custom fields
- Meta Box – A powerful and developer-friendly alternative
- CMB2 – A developer-oriented library for custom meta boxes
Here’s a simple example using the native WordPress meta box API:
// Add Meta Box
function portfolio_meta_boxes() {
    add_meta_box(
        'portfolio_details',
        'Portfolio Details',
        'portfolio_details_callback',
        'portfolio',
        'normal',
        'default'
    );
}
add_action( 'add_meta_boxes', 'portfolio_meta_boxes' );

// Meta Box Callback
function portfolio_details_callback( $post ) {
    wp_nonce_field( basename( __FILE__ ), 'portfolio_nonce' );
    $client_name = get_post_meta( $post->ID, 'client_name', true );
    $project_date = get_post_meta( $post->ID, 'project_date', true );
    ?>
    <p>
        <label for="client_name">Client Name:</label>
        <input type="text" name="client_name" id="client_name" value="<?php echo esc_attr( $client_name ); ?>" size="30" />
    </p>
    <p>
        <label for="project_date">Project Date:</label>
        <input type="date" name="project_date" id="project_date" value="<?php echo esc_attr( $project_date ); ?>" />
    </p>
    <?php
}

// Save Meta Box Data
function save_portfolio_meta( $post_id ) {
    // Check if our nonce is set and verify it
    if ( !isset( $_POST['portfolio_nonce'] ) || !wp_verify_nonce( $_POST['portfolio_nonce'], basename( __FILE__ ) ) ) {
        return;
    }

    // Check if user has permissions to save data
    if ( ! current_user_can( 'edit_post', $post_id ) ) {
        return;
    }

    // Check if not an autosave
    if ( wp_is_post_autosave( $post_id ) ) {
        return;
    }

    // Check if not a revision
    if ( wp_is_post_revision( $post_id ) ) {
        return;
    }

    // Update meta fields
    if ( isset( $_POST['client_name'] ) ) {
        update_post_meta( $post_id, 'client_name', sanitize_text_field( $_POST['client_name'] ) );
    }

    if ( isset( $_POST['project_date'] ) ) {
        update_post_meta( $post_id, 'project_date', sanitize_text_field( $_POST['project_date'] ) );
    }
}
add_action( 'save_post_portfolio', 'save_portfolio_meta' );
However, I strongly recommend using Advanced Custom Fields (ACF) for a more user-friendly experience. ACF provides a visual interface for creating custom fields and handles all the saving and loading logic for you.
Customizing the Admin Interface
You can enhance the admin experience by customizing how your custom post type appears in the WordPress dashboard:
// Customize Admin Columns
function portfolio_custom_columns( $columns ) {
    $columns = array(
        'cb' => $columns['cb'],
        'title' => __( 'Project Title', 'text_domain' ),
        'featured_image' => __( 'Thumbnail', 'text_domain' ),
        'client_name' => __( 'Client', 'text_domain' ),
        'project_type' => __( 'Project Type', 'text_domain' ),
        'date' => $columns['date']
    );
    return $columns;
}
add_filter( 'manage_portfolio_posts_columns', 'portfolio_custom_columns' );

// Fill Custom Columns
function portfolio_column_content( $column, $post_id ) {
    switch ( $column ) {
        case 'featured_image':
            echo get_the_post_thumbnail( $post_id, array(50, 50) );
            break;
        case 'client_name':
            echo get_post_meta( $post_id, 'client_name', true );
            break;
        case 'project_type':
            $terms = get_the_terms( $post_id, 'project_type' );
            if ( !empty( $terms ) ) {
                $output = array();
                foreach ( $terms as $term ) {
                    $output[] = '<a href="' . esc_url( add_query_arg( array( 'post_type' => 'portfolio', 'project_type' => $term->slug ), 'edit.php' ) ) . '">' . esc_html( $term->name ) . '</a>';
                }
                echo join( ', ', $output );
            }
            break;
    }
}
add_action( 'manage_portfolio_posts_custom_column', 'portfolio_column_content', 10, 2 );

// Make Columns Sortable
function portfolio_sortable_columns( $columns ) {
    $columns['client_name'] = 'client_name';
    return $columns;
}
add_filter( 'manage_edit-portfolio_sortable_columns', 'portfolio_sortable_columns' );
This code customizes the admin columns for our Portfolio CPT, adding a thumbnail preview, client name, and project type columns, and makes the client name column sortable.
Displaying Custom Post Types on the Frontend
Once you’ve created your custom post types and added the necessary fields, you’ll want to display them on your website. There are several approaches:
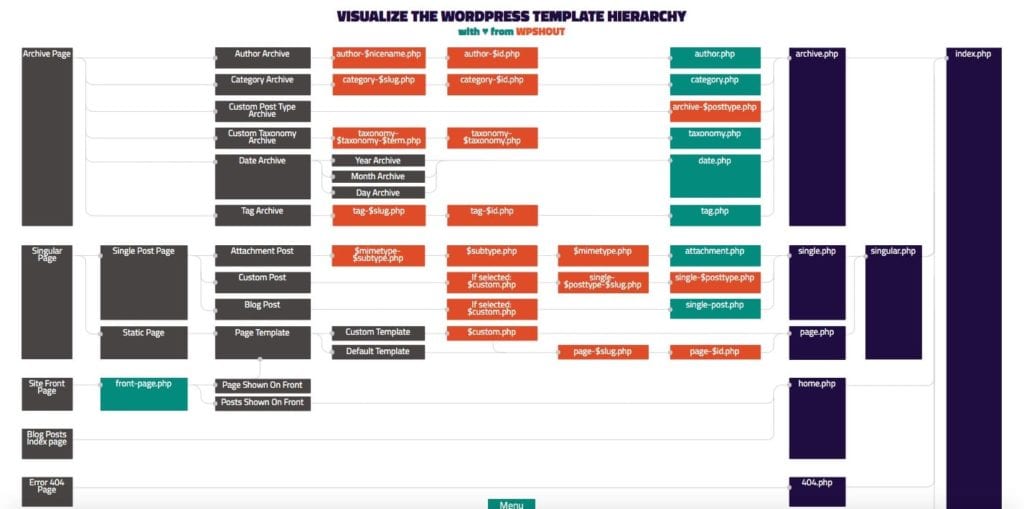
1. Template Hierarchy
WordPress has a template hierarchy system that lets you create specific templates for your custom post types:
- single-{post_type}.php – For individual post type items (e.g., single-portfolio.php)
- archive-{post_type}.php – For post type archives (e.g., archive-portfolio.php)
- taxonomy-{taxonomy}-{term}.php – For specific taxonomy terms (e.g., taxonomy-project_type-web-design.php)
Create these templates in your theme to customize how your custom post types appear.
2. The Loop with Custom Queries
You can use WordPress’s WP_Query to display custom post types anywhere on your site:
<?php
// Custom query to display portfolio items
$portfolio_query = new WP_Query( array(
    'post_type' => 'portfolio',
    'posts_per_page' => 6,
    'tax_query' => array(
        array(
            'taxonomy' => 'project_type',
            'field'    => 'slug',
            'terms'    => 'featured',
        ),
    ),
) );

if ( $portfolio_query->have_posts() ) :
    echo '<div class="portfolio-grid">';
    while ( $portfolio_query->have_posts() ) : $portfolio_query->the_post();
        ?>
        <div class="portfolio-item">
            <a href="<?php the_permalink(); ?>">
                <?php the_post_thumbnail( 'medium' ); ?>
                <h3><?php the_title(); ?></h3>
                <?php
                $client = get_post_meta( get_the_ID(), 'client_name', true );
                if ( $client ) {
                    echo '<p class="client">Client: ' . esc_html( $client ) . '</p>';
                }
                ?>
            </a>
        </div>
        <?php
    endwhile;
    echo '</div>';
    wp_reset_postdata();
else :
    echo '<p>No portfolio items found.</p>';
endif;
?>
3. Block Editor (Gutenberg) Integration
If you’re using the WordPress block editor, you can create custom blocks to display your custom post types. The “Query Loop” block in WordPress 5.8+ makes this easier, but you can also use plugins like ACF Blocks or create custom blocks with JavaScript.
4. REST API Integration
For headless WordPress setups or dynamic JavaScript interfaces, you can leverage the WordPress REST API to fetch and display custom post types:
// Example using fetch API
fetch('/wp-json/wp/v2/portfolio?_embed&per_page=3')
  .then(response => response.json())
  .then(posts => {
    const portfolioContainer = document.getElementById('portfolio-items');
    posts.forEach(post => {
      const portfolioItem = document.createElement('div');
      portfolioItem.classList.add('portfolio-item');

      // Get featured image if available
      let featuredImage = '';
      if (post._embedded && post._embedded['wp:featuredmedia']) {
        featuredImage = `<img src="${post._embedded['wp:featuredmedia'][0].source_url}" alt="${post.title.rendered}">`;
      }

      portfolioItem.innerHTML = `
        <a href="${post.link}">
          ${featuredImage}
          <h3>${post.title.rendered}</h3>
          <div class="excerpt">${post.excerpt.rendered}</div>
        </a>
      `;

      portfolioContainer.appendChild(portfolioItem);
    });
  })
  .catch(error => console.error('Error fetching portfolio items:', error));
This is particularly useful for sites using frameworks like React or Vue.js in a headless CMS setup.
Real-World Example: Creating a Testimonials System
Let’s put it all together with a complete example of creating a testimonials system with custom post types. This example includes:
- Custom post type registration
- Custom fields
- Admin customization
- Frontend display
<?php
/**
 * Testimonials Custom Post Type
 */

// Register Custom Post Type
function create_testimonials_cpt() {
    $labels = array(
        'name'                  => _x( 'Testimonials', 'Post Type General Name', 'text_domain' ),
        'singular_name'         => _x( 'Testimonial', 'Post Type Singular Name', 'text_domain' ),
        'menu_name'             => __( 'Testimonials', 'text_domain' ),
        'all_items'             => __( 'All Testimonials', 'text_domain' ),
        'add_new_item'          => __( 'Add New Testimonial', 'text_domain' ),
        'add_new'               => __( 'Add New', 'text_domain' ),
        'edit_item'             => __( 'Edit Testimonial', 'text_domain' ),
        'view_item'             => __( 'View Testimonial', 'text_domain' ),
        'search_items'          => __( 'Search Testimonials', 'text_domain' ),
    );

    $args = array(
        'label'                 => __( 'Testimonial', 'text_domain' ),
        'description'           => __( 'Customer testimonials', 'text_domain' ),
        'labels'                => $labels,
        'supports'              => array( 'title', 'editor', 'thumbnail' ),
        'hierarchical'          => false,
        'public'                => true,
        'show_ui'               => true,
        'show_in_menu'          => true,
        'menu_position'         => 20,
        'menu_icon'             => 'dashicons-format-quote',
        'show_in_admin_bar'     => true,
        'show_in_nav_menus'     => true,
        'can_export'            => true,
        'has_archive'           => false,
        'exclude_from_search'   => true,
        'publicly_queryable'    => true,
        'capability_type'       => 'page',
        'show_in_rest'          => true,
    );

    register_post_type( 'testimonial', $args );
}
add_action( 'init', 'create_testimonials_cpt', 0 );

// Add testimonial source taxonomy
function create_testimonial_source_taxonomy() {
    $labels = array(
        'name'              => _x( 'Sources', 'taxonomy general name', 'text_domain' ),
        'singular_name'     => _x( 'Source', 'taxonomy singular name', 'text_domain' ),
        'search_items'      => __( 'Search Sources', 'text_domain' ),
        'all_items'         => __( 'All Sources', 'text_domain' ),
        'edit_item'         => __( 'Edit Source', 'text_domain' ),
        'update_item'       => __( 'Update Source', 'text_domain' ),
        'add_new_item'      => __( 'Add New Source', 'text_domain' ),
        'new_item_name'     => __( 'New Source Name', 'text_domain' ),
        'menu_name'         => __( 'Sources', 'text_domain' ),
    );

    $args = array(
        'hierarchical'      => false,
        'labels'            => $labels,
        'show_ui'           => true,
        'show_admin_column' => true,
        'query_var'         => true,
        'rewrite'           => array( 'slug' => 'testimonial-source' ),
        'show_in_rest'      => true,
    );

    register_taxonomy( 'testimonial_source', array( 'testimonial' ), $args );
}
add_action( 'init', 'create_testimonial_source_taxonomy', 0 );

// Add Meta Box
function testimonial_meta_boxes() {
    add_meta_box(
        'testimonial_details',
        'Testimonial Details',
        'testimonial_details_callback',
        'testimonial',
        'normal',
        'high'
    );
}
add_action( 'add_meta_boxes', 'testimonial_meta_boxes' );

// Meta Box Callback
function testimonial_details_callback( $post ) {
    wp_nonce_field( basename( __FILE__ ), 'testimonial_nonce' );
    $client_name = get_post_meta( $post->ID, '_client_name', true );
    $client_company = get_post_meta( $post->ID, '_client_company', true );
    $client_position = get_post_meta( $post->ID, '_client_position', true );
    $rating = get_post_meta( $post->ID, '_rating', true );
    ?>
    <p>
        <label for="client_name"><strong>Client Name:</strong></label>
        <input type="text" name="client_name" id="client_name" value="<?php echo esc_attr( $client_name ); ?>" class="widefat" />
        <span class="description">Name of the person giving the testimonial</span>
    </p>
    <p>
        <label for="client_company"><strong>Company:</strong></label>
        <input type="text" name="client_company" id="client_company" value="<?php echo esc_attr( $client_company ); ?>" class="widefat" />
    </p>
    <p>
        <label for="client_position"><strong>Position:</strong></label>
        <input type="text" name="client_position" id="client_position" value="<?php echo esc_attr( $client_position ); ?>" class="widefat" />
    </p>
    <p>
        <label for="rating"><strong>Rating (1-5):</strong></label>
        <select name="rating" id="rating">
            <option value="">Select Rating</option>
            <?php for ($i = 1; $i <= 5; $i++) : ?>
                <option value="<?php echo $i; ?>" <?php selected( $rating, $i ); ?>><?php echo $i; ?> Star<?php echo $i > 1 ? 's' : ''; ?></option>
            <?php endfor; ?>
        </select>
    </p>
    <?php
}

// Save Meta Box Data
function save_testimonial_meta( $post_id ) {
    // Check if our nonce is set and verify it
    if ( !isset( $_POST['testimonial_nonce'] ) || !wp_verify_nonce( $_POST['testimonial_nonce'], basename( __FILE__ ) ) ) {
        return;
    }

    // Check user permissions
    if ( ! current_user_can( 'edit_post', $post_id ) ) {
        return;
    }

    // Check for autosave/bulk edit
    if ( wp_is_post_autosave( $post_id ) || wp_is_post_revision( $post_id ) ) {
        return;
    }

    // Save meta fields
    $fields = array(
        'client_name' => 'sanitize_text_field',
        'client_company' => 'sanitize_text_field',
        'client_position' => 'sanitize_text_field',
        'rating' => 'absint'
    );

    foreach ( $fields as $field => $sanitize_callback ) {
        if ( isset( $_POST[$field] ) ) {
            $value = call_user_func( $sanitize_callback, $_POST[$field] );
            update_post_meta( $post_id, '_' . $field, $value );
        }
    }
}
add_action( 'save_post_testimonial', 'save_testimonial_meta' );

// Customize Admin Columns
function testimonial_custom_columns( $columns ) {
    $columns = array(
        'cb' => $columns['cb'],
        'title' => __( 'Testimonial', 'text_domain' ),
        'featured_image' => __( 'Photo', 'text_domain' ),
        'client_details' => __( 'Client', 'text_domain' ),
        'rating' => __( 'Rating', 'text_domain' ),
        'testimonial_source' => __( 'Source', 'text_domain' ),
        'date' => $columns['date']
    );
    return $columns;
}
add_filter( 'manage_testimonial_posts_columns', 'testimonial_custom_columns' );

// Fill Custom Columns
function testimonial_column_content( $column, $post_id ) {
    switch ( $column ) {
        case 'featured_image':
            if ( has_post_thumbnail( $post_id ) ) {
                echo get_the_post_thumbnail( $post_id, array(50, 50) );
            } else {
                echo '—';
            }
            break;
        case 'client_details':
            $name = get_post_meta( $post_id, '_client_name', true );
            $company = get_post_meta( $post_id, '_client_company', true );
            $position = get_post_meta( $post_id, '_client_position', true );

            echo esc_html( $name );
            if ( $company ) {
                echo '<br><small>' . esc_html( $company ) . '</small>';
            }
            if ( $position ) {
                echo '<br><small>' . esc_html( $position ) . '</small>';
            }
            break;
        case 'rating':
            $rating = get_post_meta( $post_id, '_rating', true );
            if ( $rating ) {
                for ( $i = 1; $i <= 5; $i++ ) {
                    echo $i <= $rating ? '★' : '☆';
                }
            } else {
                echo '—';
            }
            break;
        case 'testimonial_source':
            $terms = get_the_terms( $post_id, 'testimonial_source' );
            if ( !empty( $terms ) ) {
                $output = array();
                foreach ( $terms as $term ) {
                    $output[] = '<a href="' . esc_url( add_query_arg( array( 'post_type' => 'testimonial', 'testimonial_source' => $term->slug ), 'edit.php' ) ) . '">' . esc_html( $term->name ) . '</a>';
                }
                echo join( ', ', $output );
            } else {
                echo '—';
            }
            break;
    }
}
add_action( 'manage_testimonial_posts_custom_column', 'testimonial_column_content', 10, 2 );

// Make Columns Sortable
function testimonial_sortable_columns( $columns ) {
    $columns['rating'] = 'rating';
    return $columns;
}
add_filter( 'manage_edit-testimonial_sortable_columns', 'testimonial_sortable_columns' );

// Modify the query for sorting
function testimonial_custom_orderby( $query ) {
    if ( ! is_admin() || ! $query->is_main_query() ) {
        return;
    }

    if ( 'testimonial' === $query->get( 'post_type' ) && $query->get( 'orderby' ) === 'rating' ) {
        $query->set( 'meta_key', '_rating' );
        $query->set( 'orderby', 'meta_value_num' );
    }
Displaying Testimonials on the Frontend
Now let’s create a function to display our testimonials on the frontend. We’ll create a shortcode that allows various display options:
// Testimonials Shortcode
function testimonials_shortcode( $atts ) {
    $atts = shortcode_atts( array(
        'count' => 3,
        'source' => '',
        'orderby' => 'date',
        'order' => 'DESC',
        'layout' => 'grid', // grid, slider, list
        'rating' => 0, // minimum rating to display
    ), $atts, 'testimonials' );

    // Build query args
    $args = array(
        'post_type' => 'testimonial',
        'posts_per_page' => intval( $atts['count'] ),
        'orderby' => $atts['orderby'],
        'order' => $atts['order'],
    );

    // Filter by source if specified
    if ( !empty( $atts['source'] ) ) {
        $args['tax_query'] = array(
            array(
                'taxonomy' => 'testimonial_source',
                'field'    => 'slug',
                'terms'    => explode( ',', $atts['source'] ),
            ),
        );
    }

    // Filter by minimum rating if specified
    if ( intval( $atts['rating'] ) > 0 ) {
        $args['meta_query'] = array(
            array(
                'key'     => '_rating',
                'value'   => intval( $atts['rating'] ),
                'compare' => '>=',
                'type'    => 'NUMERIC',
            ),
        );
    }

    // Run the query
    $testimonials_query = new WP_Query( $args );

    // Start output buffer
    ob_start();

    if ( $testimonials_query->have_posts() ) :
        // Container class based on layout
        $container_class = 'testimonials-' . $atts['layout'];
        echo '<div class="testimonials-container ' . esc_attr( $container_class ) . '">';

        while ( $testimonials_query->have_posts() ) : $testimonials_query->the_post();
            $post_id = get_the_ID();
            $client_name = get_post_meta( $post_id, '_client_name', true );
            $client_company = get_post_meta( $post_id, '_client_company', true );
            $client_position = get_post_meta( $post_id, '_client_position', true );
            $rating = get_post_meta( $post_id, '_rating', true );

            echo '<div class="testimonial-item">';

            // Client photo
            if ( has_post_thumbnail() ) {
                echo '<div class="testimonial-image">';
                the_post_thumbnail( 'thumbnail' );
                echo '</div>';
            }

            // Testimonial content
            echo '<div class="testimonial-content">';
            echo '<blockquote>' . get_the_content() . '</blockquote>';

            // Rating stars
            if ( $rating ) {
                echo '<div class="testimonial-rating">';
                for ( $i = 1; $i <= 5; $i++ ) {
                    echo '<span class="star ' . ( $i <= $rating ? 'filled' : 'empty' ) . '">★</span>';
                }
                echo '</div>';
            }

            // Client info
            echo '<div class="testimonial-author">';
            if ( $client_name ) {
                echo '<strong>' . esc_html( $client_name ) . '</strong>';
            }

            if ( $client_company || $client_position ) {
                echo '<span class="testimonial-meta">';
                if ( $client_position ) {
                    echo esc_html( $client_position );
                }
                if ( $client_company && $client_position ) {
                    echo ', ';
                }
                if ( $client_company ) {
                    echo esc_html( $client_company );
                }
                echo '</span>';
            }
            echo '</div>'; // .testimonial-author

            echo '</div>'; // .testimonial-content
            echo '</div>'; // .testimonial-item
        endwhile;

        echo '</div>'; // .testimonials-container

        // Add slider initialization if layout is 'slider'
        if ( $atts['layout'] === 'slider' ) {
            ?>
            <script>
            document.addEventListener('DOMContentLoaded', function() {
                // This is a simple slider example - you would typically use a proper slider library
                const container = document.querySelector('.testimonials-slider');
                const items = container.querySelectorAll('.testimonial-item');
                let currentIndex = 0;

                // Hide all items except the first one
                items.forEach((item, index) => {
                    if (index !== 0) item.style.display = 'none';
                });

                // Create navigation
                const nav = document.createElement('div');
                nav.className = 'testimonial-nav';

                const prevBtn = document.createElement('button');
                prevBtn.textContent = 'Previous';
                prevBtn.addEventListener('click', () => {
                    items[currentIndex].style.display = 'none';
                    currentIndex = (currentIndex - 1 + items.length) % items.length;
                    items[currentIndex].style.display = 'block';
                });

                const nextBtn = document.createElement('button');
                nextBtn.textContent = 'Next';
                nextBtn.addEventListener('click', () => {
                    items[currentIndex].style.display = 'none';
                    currentIndex = (currentIndex + 1) % items.length;
                    items[currentIndex].style.display = 'block';
                });

                nav.appendChild(prevBtn);
                nav.appendChild(nextBtn);
                container.appendChild(nav);
            });
            </script>
            <?php
        }

        wp_reset_postdata();
    else :
        echo '<p>No testimonials found.</p>';
    endif;

    return ob_get_clean();
}
add_shortcode( 'testimonials', 'testimonials_shortcode' );

// Add basic CSS for testimonials
function testimonials_styles() {
    ?>
    <style>
        /* Basic styling for testimonials */
        .testimonials-container {
            margin: 2em 0;
        }

        .testimonial-item {
            margin-bottom: 2em;
            padding: 1.5em;
            border: 1px solid #eaeaea;
            border-radius: 5px;
            background-color: #f9f9f9;
        }

        /* Grid layout */
        .testimonials-grid {
            display: grid;
            grid-template-columns: repeat(auto-fill, minmax(300px, 1fr));
            grid-gap: 2em;
        }

        /* List layout */
        .testimonials-list .testimonial-item {
            display: flex;
            align-items: flex-start;
        }

        .testimonials-list .testimonial-image {
            flex: 0 0 100px;
            margin-right: 1.5em;
        }

        .testimonials-list .testimonial-content {
            flex: 1;
        }

        /* Common styles */
        .testimonial-image img {
            border-radius: 50%;
            max-width: 80px;
            height: auto;
        }

        .testimonial-content blockquote {
            font-style: italic;
            margin: 0 0 1em;
            padding: 0;
            border-left: none;
        }

        .testimonial-rating {
            margin: 0.5em 0;
        }

        .testimonial-rating .star {
            color: #ccc;
        }

        .testimonial-rating .star.filled {
            color: #ffb900;
        }

        .testimonial-author {
            margin-top: 1em;
        }

        .testimonial-meta {
            display: block;
            font-size: 0.9em;
            color: #666;
        }

        /* Slider navigation */
        .testimonial-nav {
            display: flex;
            justify-content: space-between;
            margin-top: 1em;
        }

        .testimonial-nav button {
            background-color: #0073aa;
            color: white;
            border: none;
            padding: 0.5em 1em;
            cursor: pointer;
            border-radius: 3px;
        }
    </style>
    <?php
}
add_action( 'wp_head', 'testimonials_styles' );
Now you can use this shortcode in your posts, pages, or widgets:
[testimonials count="4" layout="grid" source="website" rating="4"]
Optimizing Custom Post Types for Performance
As your site grows, it’s important to optimize your custom post types for performance. Here are some best practices:
1. Only Register What You Need
When defining your custom post types, only enable the features you actually need:
- If you don’t need comments, don’t include ‘comments’ in the ‘supports’ array
- If your CPT doesn’t need categories or tags, don’t attach those taxonomies
- If you don’t need post revisions, disable them with ‘supports’ => array(‘title’, ‘editor’) (excluding ‘revisions’)
2. Use Proper Indexing for Meta Queries
If you frequently query posts by meta values, make sure your database is properly indexed. This is especially important for sites with thousands of custom post type entries.
3. Implement Caching
For frequently accessed custom post type data, implement caching using the WordPress Transients API:
function get_featured_testimonials() {
    // Check if we have cached data
    $cached = get_transient( 'featured_testimonials' );

    if ( false === $cached ) {
        // Cache doesn't exist or has expired, fetch fresh data
        $args = array(
            'post_type' => 'testimonial',
            'posts_per_page' => 5,
            'meta_query' => array(
                array(
                    'key' => '_rating',
                    'value' => 4,
                    'compare' => '>=',
                    'type' => 'NUMERIC',
                ),
            ),
        );

        $testimonials = get_posts( $args );

        // Cache the result for 12 hours
        set_transient( 'featured_testimonials', $testimonials, 12 * HOUR_IN_SECONDS );

        return $testimonials;
    }

    return $cached;
}
This approach is particularly valuable for complex queries or data that doesn’t change frequently.
4. Consider Using Post Type Connections
For complex relationships between post types, consider using a plugin like Posts 2 Posts or a custom solution that stores relationships efficiently.
5. Optimize Your Images
If your custom post types use featured images or galleries, make sure to optimize your images for WordPress to maintain good page speed performance.
Security Considerations for Custom Post Types
When working with custom post types, keep these security best practices in mind:
1. Validate and Sanitize All User Input
Always validate and sanitize data before saving it to the database:
// Instead of this
update_post_meta( $post_id, '_client_name', $_POST['client_name'] );

// Do this
if ( isset( $_POST['client_name'] ) ) {
    update_post_meta( $post_id, '_client_name', sanitize_text_field( $_POST['client_name'] ) );
}
2. Use Nonces for Form Submissions
Always use nonces to verify form submissions come from authorized sources:
// Generate a nonce
wp_nonce_field( basename( __FILE__ ), 'my_cpt_nonce' );

// Verify the nonce when processing
if ( !isset( $_POST['my_cpt_nonce'] ) || !wp_verify_nonce( $_POST['my_cpt_nonce'], basename( __FILE__ ) ) ) {
    return;
}
3. Check User Capabilities
Always verify that users have appropriate permissions before processing their actions:
if ( ! current_user_can( 'edit_post', $post_id ) ) {
    return;
}
4. Use Prefixes for Meta Keys
Prefix your meta keys to avoid conflicts with other plugins or themes:
// Instead of
update_post_meta( $post_id, 'client_name', $value );

// Do this
update_post_meta( $post_id, '_jkb_client_name', $value );
Troubleshooting Common Custom Post Type Issues
Problem: Custom Post Type 404 Errors
If your custom post type entries return 404 errors, try these solutions:
- Make sure ‘publicly_queryable’ is set to true
- Check that ‘has_archive’ is set correctly based on your needs
- Flush your permalink structure by going to Settings > Permalinks and clicking Save
Problem: Custom Taxonomies Not Appearing
If your custom taxonomies aren’t showing up:
- Verify that you’ve registered the taxonomy correctly
- Make sure you’ve associated the taxonomy with your post type
- Check the ‘show_ui’ and ‘show_in_menu’ arguments are set to true
Problem: Custom Fields Not Saving
If your custom fields aren’t saving properly:
- Check your save function for proper nonce verification
- Verify that your meta keys match between the display and save functions
- Make sure your field names in the HTML match what you’re checking for in the save function
Integrating Custom Post Types with Page Builders
Most popular WordPress page builders support custom post types. Here’s how to integrate your CPTs with some popular builders:
Elementor Integration
Elementor Pro includes a Posts widget that can display custom post types. You can also create custom skins for your post types.
Beaver Builder Integration
Beaver Builder can display custom post types using the Posts module. You might need to use the Beaver Themer add-on for more complex layouts.
Divi Integration
Divi’s Blog module can display custom post types. Select your CPT from the Post Type dropdown in the module settings.
Conclusion
Custom post types are one of WordPress’s most powerful features, allowing you to transform it from a simple blogging platform into a full-featured content management system tailored to your specific needs.
By mastering custom post types, you’ll be able to create more organized, maintainable, and user-friendly WordPress sites for your clients or your own projects. The flexibility they provide allows you to structure content exactly how you need it, making WordPress suitable for virtually any type of website.
As you continue your WordPress development journey, consider exploring more advanced topics like creating child themes, implementing WordPress security best practices, or setting up a WordPress multisite network. And if you need professional help with your WordPress project, don’t hesitate to contact me for expert WordPress development services.
Remember that custom post types are just one part of creating a great WordPress site. For a complete solution, you’ll also want to consider other aspects like page speed optimization, proper SSL implementation, and selecting the right WordPress hosting provider.
I hope this guide has given you a comprehensive understanding of WordPress custom post types and how to implement them effectively in your projects. Happy WordPress developing!
Advanced Custom Post Type FeaturesDisplaying Custom Post Types on the FrontendUsing a Plugin to Create Custom Post Types
Jackober is a seasoned WordPress expert and digital strategist with a passion for empowering website owners. With years of hands-on experience in web development, SEO, and online security, Jackober delivers reliable, practical insights to help you build, secure, and optimize your WordPress site with ease.
You might also like