
WordPress Site Cloning Techniques: The Ultimate Guide for 2025

As a seasoned WordPress developer with years of hands-on experience, I’ve found that mastering WordPress site cloning is an essential skill for any serious web professional. Whether you’re creating a staging environment for testing updates, duplicating a successful site structure for a new client, or simply backing up your work, understanding the various cloning techniques can save you countless hours of development time.
In this comprehensive guide, I’ll walk you through everything you need to know about WordPress site cloning in 2025, from manual methods to automated solutions, while highlighting best practices and potential pitfalls to avoid.
Why Clone a WordPress Site?

Before diving into the technical aspects, let’s explore the common scenarios where site cloning proves invaluable:
Development and Testing
Creating a duplicate site allows you to test new features, plugins, themes, or major WordPress updates without risking your live site. This is particularly important when working with e-commerce WordPress sites where downtime directly impacts revenue.
Staging Environments
A staging site is essentially a clone of your production site where you can safely make and test changes before pushing them live. Many professional WordPress developers consider this a non-negotiable part of their workflow.
Website Migration
When migrating a WordPress site to a new host, cloning is a fundamental step in the process. This ensures a seamless transition with minimal downtime.
Client Website Templates
If you build similar websites for multiple clients, having a template site that you can clone saves significant development time. For instance, if you specialize in creating sites with specific WordPress page builders, you can set up a base installation with your preferred configuration.
Training and Demonstration
Cloned sites provide a safe environment for training team members or demonstrating functionality to clients without risking the live site.
Understanding the Components of a WordPress Site
To effectively clone a WordPress site, you need to understand its core components:
- Database: Contains all your content, user information, plugin settings, and most of your site configuration.
- Files: Includes WordPress core files, themes, plugins, and media uploads.
- Domain Configuration: The DNS settings that point your domain to your hosting server.
- Server Configuration: Includes PHP settings, server software configuration, and other environment-specific settings.
A complete clone addresses all these components, though some cloning methods focus primarily on the first two.
WordPress Site Cloning Methods
Let’s explore the various methods for cloning a WordPress site, from manual approaches to automated solutions.
Method 1: Manual Cloning Process
Manual cloning gives you complete control over the process but requires more technical knowledge. Here’s how to do it:
Step 1: Backup the Original Site
Always start by creating a comprehensive backup of your site. This serves both as your cloning source and as a safety net.
- Database Backup: Use phpMyAdmin or a similar tool to export your WordPress database as an SQL file.
- Files Backup: Download all files via FTP or through your hosting control panel.
For more detailed instructions on creating backups, check out my guide on how to backup WordPress site.
Step 2: Set Up the New Environment
- Create a new database: Set up a fresh database on your target server.
- Upload WordPress files: Transfer all the WordPress files to the new server.
Step 3: Import the Database
- Import the SQL file into your new database using phpMyAdmin or a similar tool.
- Edit the wp-config.php file to match the new database credentials.
Step 4: Update Site URLs
This is a crucial step where many manual cloning attempts fail. You need to update all instances of your old domain to the new one in the database. There are several ways to do this:
- Using SQL queries: Run SQL queries to replace the old domain with the new one.
UPDATE wp_options SET option_value = REPLACE(option_value, 'https://olddomain.com', 'https://newdomain.com') WHERE option_name = 'home' OR option_name = 'siteurl';
- Using wp-config.php constants: Add these lines to your wp-config.php file to override the WordPress site URL settings:
   define('WP_HOME', 'https://newdomain.com');
   define('WP_SITEURL', 'https://newdomain.com');
- Using a search and replace tool: For a more thorough solution, use a tool like WordPress Database Search and Replace to update all instances of the old domain in your database, including serialized data.
Step 5: Fix Permalinks and Update Configuration
- Log in to your WordPress admin area.
- Go to Settings > Permalinks and simply save the settings again (this refreshes the permalink structure).
- Check and update any environment-specific configurations.
Pros and Cons of Manual Cloning
Pros:
- Complete control over the process
- No need for additional plugins
- Works across different hosting environments
- Free of charge
Cons:
- Time-consuming
- Requires technical knowledge
- Prone to human error
- Challenging for large sites with complex configurations
Method 2: Using Plugins for Site Cloning
Several WordPress plugins can simplify the cloning process significantly:
Duplicator
Duplicator is one of the most popular WordPress migration and cloning plugins, offering both free and premium versions.
How to use Duplicator:
- Install and activate the Duplicator plugin on your source site.
- Create a new package (which includes both files and database).
- Download the installer.php file and the archive package.
- Upload both files to your destination server.
- Run the installer by navigating to installer.php in your browser.
- Follow the wizard to complete the installation.
Duplicator handles the database search and replace automatically, making it particularly user-friendly.
Also Read:
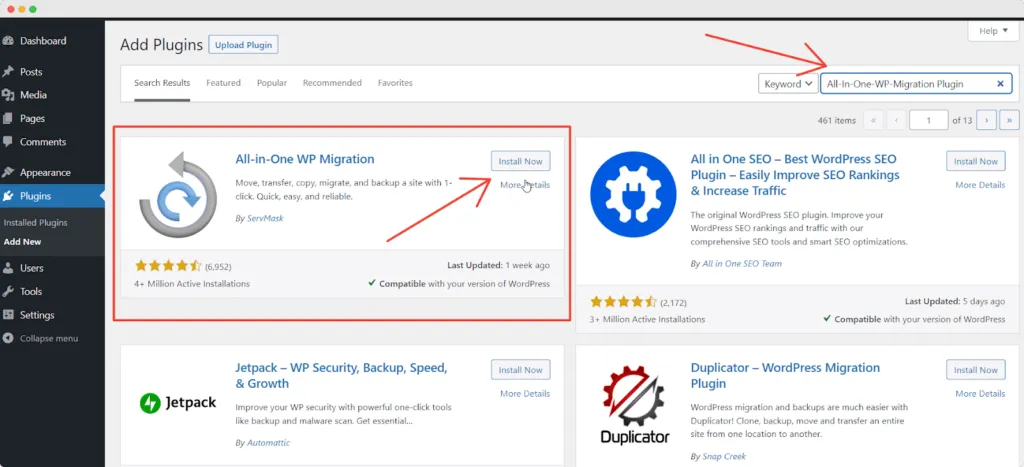
All-in-One WP Migration
This plugin offers a straightforward approach to cloning:
- Install the plugin on your source site.
- Export your site as a single file.
- Install the same plugin on your destination site.
- Import the file you exported.
The free version has size limitations, but premium extensions remove these constraints.
WP Staging
WP Staging specializes in creating staging environments and is particularly useful for testing:
- Install WP Staging on your production site.
- Use the plugin to create a staging copy directly on the same server.
- Work on your staging site, then push changes back to production when ready.
Pros and Cons of Plugin-Based Cloning
Pros:
- User-friendly with minimal technical knowledge required
- Automated handling of database search and replace
- Often includes additional features like scheduled backups
- Generally faster than manual methods
Cons:
- Some plugins have size limitations in their free versions
- May not work with all hosting environments
- Potential compatibility issues with certain server configurations
- Premium versions can be costly for one-time use
Method 3: Using Hosting Provider Tools
Many WordPress hosting providers offer built-in cloning functionality:
WP Engine
WP Engine makes cloning straightforward:
- Log in to your WP Engine User Portal.
- Select the site you want to clone.
- Click on “Copy site” and select your target environment.
- Wait for the process to complete (usually a few minutes).
Flywheel
Flywheel WordPress hosting offers a similar one-click cloning experience:
- Access your Flywheel dashboard.
- Select the site you want to clone.
- Choose the “Clone site” option.
- Configure your new site settings and confirm.
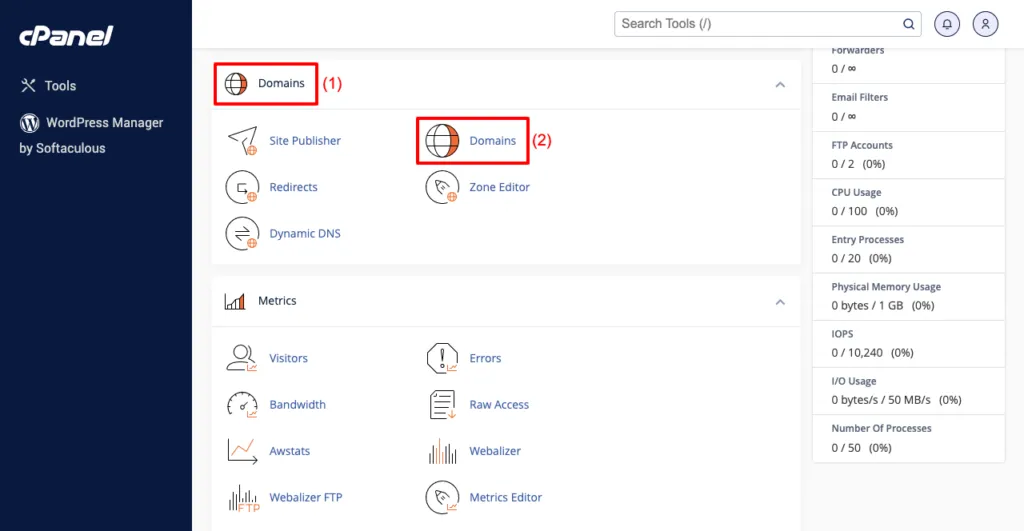
SiteGround
SiteGround offers site cloning through their SG Site Tools:
- Access Site Tools for your website.
- Navigate to WordPress > Staging.
- Create a staging copy or clone to a new site.
Pros and Cons of Hosting Provider Cloning
Pros:
- Extremely user-friendly, often requiring just a few clicks
- Optimized for the specific hosting environment
- Technical support available if issues arise
- Often includes staging-to-production deployment features
Cons:
- Only available if you use these specific hosting providers
- May have limitations on how many clones you can create
- Sometimes lacks advanced customization options
- Usually requires a more expensive hosting plan
Method 4: Using WP-CLI for Cloning
For developers comfortable with command-line interfaces, WP-CLI offers powerful cloning capabilities:
Prerequisites:
- WP-CLI installed on both source and destination servers
- SSH access to both servers
- Basic command-line knowledge
Cloning Process with WP-CLI:
- Backup the database:
wp db export database-backup.sql
- Create a file archive:
tar -czf wordpress-files.tar.gz wp-content/
- Transfer files to the new server using SCP or similar:
scp database-backup.sql wordpress-files.tar.gz user@newserver:/path/to/destination/
- Set up the new site on the destination server:
   # Extract files
   tar -xzf wordpress-files.tar.gz

   # Import database
   wp db import database-backup.sql

   # Update URLs
   wp search-replace 'https://olddomain.com' 'https://newdomain.com' --all-tables

   # Clear cache
   wp cache flush
Pros and Cons of WP-CLI Cloning
Pros:
- Highly efficient for developers
- Can be scripted for automation
- Works across virtually any hosting environment
- No size limitations
- Easily integrated into deployment workflows
Cons:
- Requires command-line knowledge
- Need for SSH access (not available on all hosting plans)
- Less intuitive for non-technical users
- Potential for syntax errors
Method 5: Database and File Manager Approach
This hybrid approach uses hosting control panel tools:
Step 1: Database Cloning
- Access phpMyAdmin through your hosting control panel.
- Select your WordPress database.
- Click on “Export” and save the SQL file.
- Create a new database for your cloned site.
- Import the SQL file into the new database.
Step 2: File Cloning
- Use the File Manager in your hosting control panel.
- Select all WordPress files and copy them to a new directory.
- Update the wp-config.php file with the new database details.
Step 3: URL Updates
- Use phpMyAdmin to run search and replace queries.
- Update the site URL in wp_options table.
This method is useful when you don’t have plugin installation capabilities or command-line access.
Advanced Cloning Scenarios
Let’s explore some more complex cloning scenarios and how to handle them:
Cloning Multisite Installations
WordPress Multisite installations require special handling when cloning:
- Backup the entire network: Use a tool that supports multisite, like Duplicator Pro or UpdraftPlus Premium.
- Adjust domain mapping: If using domain mapping, you’ll need to update these configurations.
- Update network tables: Pay special attention to the wp_blogs and wp_site tables.
For more details on working with multisite, check out my WordPress Multisite Setup Guide.
Cloning E-commerce Sites
E-commerce sites present unique challenges due to their complex data structures:
- Order data: Decide whether to include or exclude order history.
- Payment gateways: Ensure payment gateways for WordPress websites are set to test mode on cloned sites.
- Customer accounts: Consider anonymizing customer data for GDPR compliance.
- Product inventory: Update inventory settings to prevent duplicate stock management.
Cloning Membership Sites
If you’re working with WordPress membership plugins, consider these factors:
- User data: Determine whether to clone user accounts or start fresh.
- Subscription data: Payment subscriptions should typically not be cloned to avoid duplicate charges.
- Access controls: Verify that membership restrictions work correctly on the cloned site.
Handling Large Media Libraries
Sites with extensive media libraries require special attention:
- Selective cloning: Consider whether you need all media files or just a subset.
- Using external storage: If your media is stored on Amazon S3 or similar, you may need to update configuration.
- Image optimization: Use the cloning process as an opportunity to implement image optimization for WordPress.
Common Challenges and Solutions in WordPress Cloning
Even with the right tools, you may encounter these common issues:
Mixed Content Warnings
After cloning from HTTP to HTTPS or vice versa, you might see mixed content warnings.
Solution: Use a tool like Better Search Replace to update all HTTP references to HTTPS. For a more permanent solution, check out my guide on how to add SSL to WordPress.
Broken Links and Images
Incorrect search and replace operations can break internal links and image paths.
Solution: Use a specialized WordPress search and replace tool that handles serialized data correctly. Verify all content types after cloning.
Plugin License Issues
Some premium plugins tie licenses to specific domains and may not work on cloned sites.
Solution: Deactivate license-dependent plugins before cloning, then reactivate and update licenses on the new site. Alternatively, contact plugin developers for license transfers.
Performance Issues on Cloned Sites
Cloned sites sometimes inherit configuration that’s not optimized for the new environment.
Solution: Review and update caching configurations, implement WordPress page speed optimization techniques, and consider using WordPress cache plugins appropriate for the new environment.
Database Size Limitations
Very large databases may exceed PHP execution time or memory limits during cloning.
Solution:
- Increase PHP limits if possible
- Use a tool like WP-CLI that isn’t constrained by PHP web request limits
- Consider incremental cloning approaches for very large sites
Best Practices for WordPress Site Cloning
Based on my experience as a WordPress expert for hire, here are some best practices to ensure successful cloning:
1. Always Create a Backup First
Before attempting any cloning operation, create a complete backup of your source site. This provides a safety net if anything goes wrong during the process.
2. Clean Up Before Cloning
Perform these tasks before cloning to ensure a cleaner result:
- Delete unused themes and plugins
- Clear caches and temporary files
- Run WordPress database optimization
- Remove unnecessary post revisions using WordPress content revision control
3. Update All Software Components
Ensure WordPress core, themes, and plugins are updated before cloning to avoid propagating vulnerabilities or compatibility issues to the new site.
4. Document Your Process
Keep detailed notes of your cloning process, including any custom configurations or issues encountered. This documentation proves invaluable for future cloning operations.
5. Implement Security Measures on Cloned Sites
Cloned sites, especially staging environments, should have proper security measures:
- Password protection for staging sites
- Implement WordPress custom login URL for security
- Disallow search engine indexing
- Follow WordPress security best practices
6. Test Thoroughly After Cloning
After cloning, verify all key functionality:
- Test forms and interactive elements
- Check payment processes (in test mode)
- Verify user registration and login
- Test responsive design on multiple devices
- Check for duplicate title tags and other SEO issues
7. Consider Database Table Exclusions
Not all database tables need to be cloned. Consider excluding:
- Statistics and analytics tables
- Log files
- Caching tables
- Temporary data
Automating the WordPress Cloning Process
For agencies and developers who frequently clone sites, automation can save significant time:
Creating Cloning Scripts
Using WP-CLI and bash scripting, you can create custom cloning workflows:
#!/bin/bash

# Define variables
SOURCE_URL="https://sourcesite.com"
TARGET_URL="https://targetsite.com"
DB_NAME="new_database"
DB_USER="database_user"
DB_PASSWORD="database_password"
DB_HOST="localhost"

# Create database backup
wp db export database.sql --path=/path/to/source/wordpress

# Create files backup excluding cache and logs
tar --exclude='wp-content/cache' --exclude='wp-content/debug.log' -czf wordpress-files.tar.gz /path/to/source/wordpress

# Set up new WordPress installation
wp core download --path=/path/to/target/wordpress
wp config create --dbname=$DB_NAME --dbuser=$DB_USER --dbpass=$DB_PASSWORD --dbhost=$DB_HOST --path=/path/to/target/wordpress
wp db import database.sql --path=/path/to/target/wordpress

# Extract files
tar -xzf wordpress-files.tar.gz -C /path/to/target/wordpress --strip-components=1

# Update URLs
wp search-replace $SOURCE_URL $TARGET_URL --all-tables --path=/path/to/target/wordpress

# Flush cache
wp cache flush --path=/path/to/target/wordpress

echo "Cloning completed successfully!"
Using Git for WordPress Cloning
Git can be a powerful tool for WordPress cloning, especially for development workflows:
- Set up Git on your source WordPress installation
- Create a .gitignore file to exclude sensitive data
- Push to a repository
- Pull from the repository to your new location
- Set up the database separately
This approach works particularly well for teams and provides version control benefits.
Continuous Integration/Continuous Deployment (CI/CD)
For enterprise WordPress setups, implementing CI/CD pipelines can automate the entire cloning and deployment process:
- Use tools like Jenkins, GitHub Actions, or Bitbucket Pipelines
- Create deployment scripts that handle database and file transfers
- Implement automated testing on the cloned site
- Set up approval workflows before pushing to production
Comparing Cloning Solutions
To help you choose the right approach, here’s a comparison of popular cloning methods:
| Method | Ease of Use | Speed | Cost | Best For |
|---|---|---|---|---|
| Manual Cloning | Complex | Slow | Free | Learning the process, full control |
| Duplicator | Easy | Medium | Free/Premium | General purpose cloning and migration |
| WP Staging | Easy | Fast | Free/Premium | Creating test environments |
| Host Tools (WP Engine, etc.) | Very Easy | Very Fast | Included with hosting | Quick staging environments |
| WP-CLI | Complex | Very Fast | Free | Developers, automation |
| All-in-One WP Migration | Very Easy | Medium | Free/Premium | Simple migrations |
WordPress Cloning Use Cases
Let’s explore some real-world applications of WordPress cloning:
Case Study 1: Agency Template System
A web design agency I worked with developed a template system using WordPress cloning. They maintained several base installations with different configurations:
- E-commerce template with WooCommerce pre-configured
- Portfolio template with optimized portfolio in WordPress settings
- Magazine template using magazine WordPress themes
- Business template with landing page configurations
When a new client signed up, they would clone the appropriate template, saving 5-10 hours of setup time per project.
Case Study 2: E-commerce Seasonal Cloning
A retail client used cloning to manage seasonal variations of their store:
- The main store operated year-round
- Specialized clones were created for holiday seasons with different themes and promotions
- After each season, successful elements were merged back into the main site
This approach allowed them to experiment with seasonal designs without risking their primary store.
Case Study 3: International Site Expansion
A client expanding internationally used cloning to create localized versions of their website:
- The main site was cloned for each target country
- Each clone was customized with:
- Translated content using WordPress translation plugins
- Country-specific payment methods
- Local shipping options
- Region-appropriate imagery and marketing
This approach maintained brand consistency while allowing for necessary regional adaptations.
Future of WordPress Cloning
As WordPress continues to evolve, cloning techniques are also advancing:
Containerization
Docker and similar containerization technologies are making WordPress cloning more efficient by packaging the entire environment, not just the files and database.
Headless WordPress
With the rise of headless CMS vs WordPress approaches, cloning is becoming more complex but also more powerful, as both the backend and frontend components need to be considered.
AI-Assisted Cloning
Machine learning algorithms are beginning to assist in the cloning process by identifying potential issues before they occur and suggesting optimizations for the cloned site.
Git-Based Workflows
Version-controlled WordPress setups are becoming more common, allowing for more sophisticated cloning and deployment processes that track changes over time.
Conclusion
WordPress site cloning is a fundamental skill for developers, agencies, and site owners who need to create testing environments, migrate sites, or replicate successful websites. While the process can be technical, the variety of tools available makes it accessible regardless of your technical expertise.
Whether you choose the manual approach for complete control, plugin-based solutions for convenience, hosting provider tools for simplicity, or WP-CLI for automation, understanding the principles behind WordPress cloning will help you execute the process successfully.
Remember that the key to successful cloning lies in thorough preparation, careful execution, and comprehensive testing. By following the best practices outlined in this guide, you’ll be well-equipped to handle WordPress cloning projects of any scale.
For personalized assistance with WordPress cloning or other WordPress development needs, feel free to reach out to me at Jackober. As a dedicated WordPress professional, I’m here to help you navigate the complexities of WordPress development and make your web projects successful.
What cloning techniques have you found most effective for your WordPress projects? Share your experiences and questions in the comments below!
Jackober is a seasoned WordPress expert and digital strategist with a passion for empowering website owners. With years of hands-on experience in web development, SEO, and online security, Jackober delivers reliable, practical insights to help you build, secure, and optimize your WordPress site with ease.
You might also like